Metal Spinning Process: Essential Steps for Perfect Parts
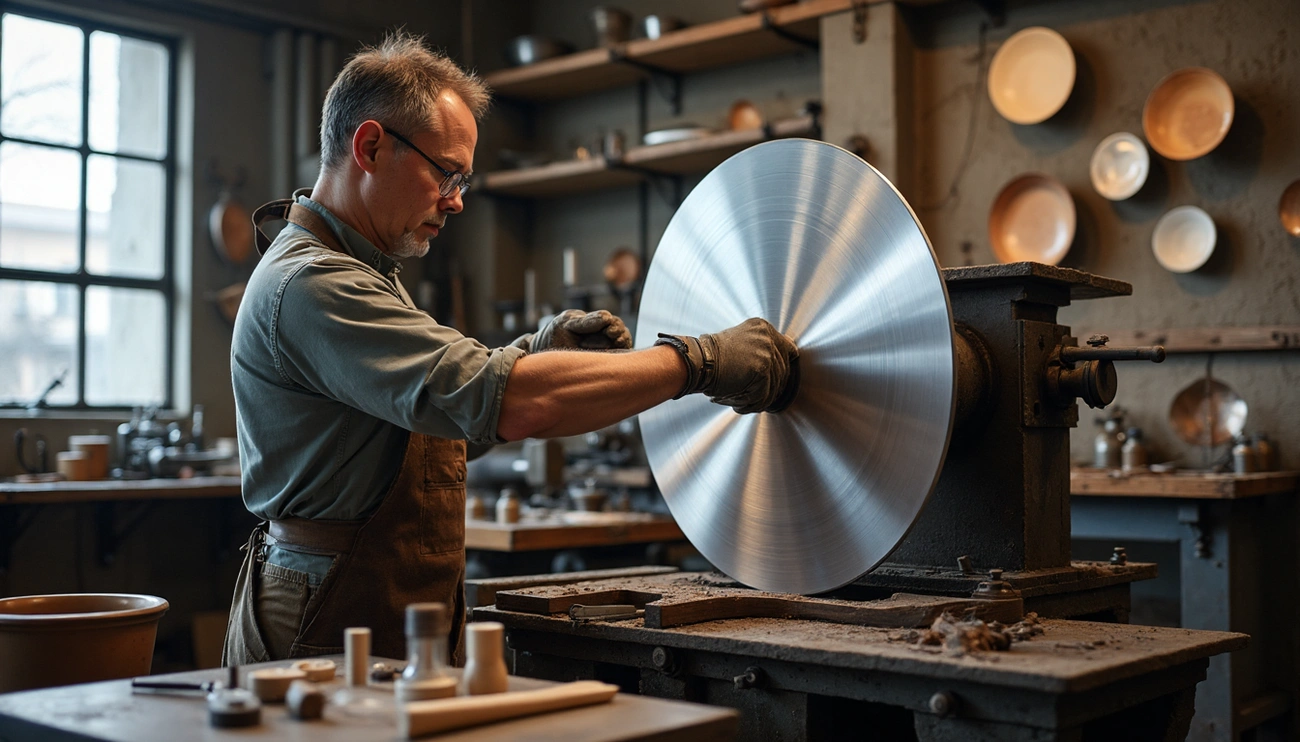
Metal spinning remains a surprisingly specialized craft with few practitioners today, even though this technique is centuries old. The process, also called spin forming, shapes metal by rotating a disk or tube at high speeds—sometimes approaching 2,000 rpm—into an axially symmetric part. This versatile method works well for both artisan specialties and commercial production.
Metal spinning gives manufacturers and metalworkers the most important advantages. A skilled operator produces an average part in just five to ten minutes, which makes it perfect for low-cost rapid prototyping. The right equipment setup includes specialized metal spinning tools and properly configured machines. The spinning manufacturing process needs careful attention to technical details like the spinning ratio and feed rate. These details help maintain uniform wall thickness and prevent material fracturing. You’ll find the steps you need to become skilled at the metal spinning process in this piece, from machine setup to finishing techniques.
Setting Up the Metal Spinning Machine
The right equipment setup is the foundation of successful metal spinning. You need to pay careful attention to each component of the metal spinning machine. This ensures the best performance and safety.
Choosing the right lathe for spinning
The size of your workpieces determines which lathe you should pick. You can use both dedicated metal spinning lathes and adapted woodturning lathes. These work well if they’re stable enough to handle the big forces involved in spinning. The lathe must be tough enough to handle all the pressure during forming operations.
Your lathe should run at speeds between 500-1000 RPM during forming. Finishing operations might need speeds up to 1800 RPM. But with a 3-jaw chuck, never go above 1000 RPM – it’s just not safe. The headstock needs to be really strong, too. Metal spinning puts way more force on the machine than regular turning operations.
Toolrest and toolpost configuration
Metal spinning needs a special toolrest setup, unlike regular woodturning or machining. Your setup must fit toolposts that give you the right fulcrum to work the spinning tools against the workpiece. A steel bar with multiple holes makes up the typical tool rest. These holes hold a peg that you use as leverage for the forming tool.
The toolrest and toolpost positions change often as you work. This happens because the metal workpiece’s diameter keeps changing. A toolrest that’s quick to adjust is a great way to get more efficient production.
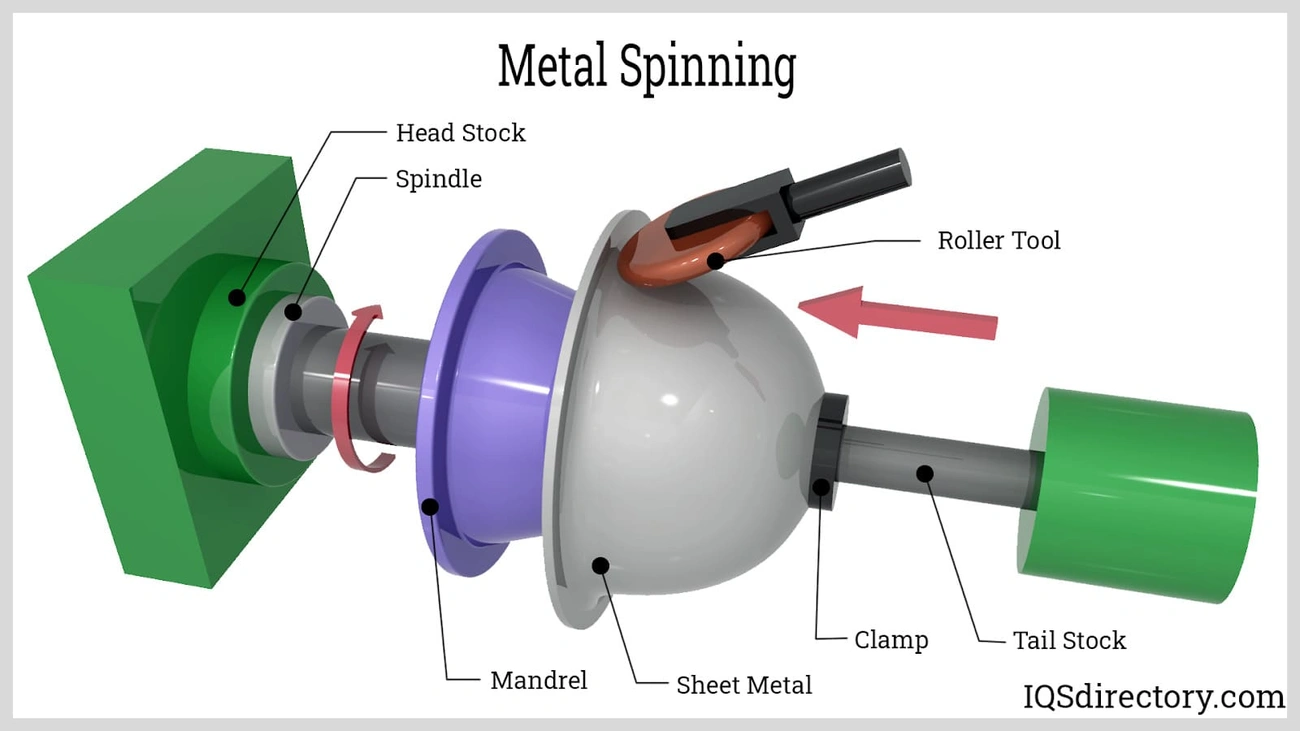
Mandrel mounting and alignment tips
Getting the mandrel aligned perfectly might be the most important part of machine setup. A mandrel that’s not centered creates eccentric chatter. This leads to poor surface finish and makes spinning much harder for the operator.
Mount your mandrels straight to a headstock plate with at least three 3/8″-16 bolts. This works better than using a 3-jaw chuck. If you must use a chuck, make sure your mandrel has a proper centering hole. It also helps to design mandrels with a minimum 1° draft angle. This makes removing parts easier after forming.
You can make mandrels from different materials based on what you need – cast iron, mild steel, tool steel, aluminum, or even magnesium for special jobs. Whatever material you pick, all mandrels must be balanced statically. They need this balance because they support and rotate the workpiece during metal spinning.
Essential Metal Spinning Tools and Materials
Metal spinning success depends on having the right tools and materials that work together perfectly. You need to pick the right tools and compatible materials to make the spinning manufacturing process work well.
Sheep’s Nose vs Duck’s Bill tool usage
Metal spinning tools each have their specific jobs in the forming process. The Sheep’s Nose tool is the go-to choice for most forming operations. It has a hooked nose that works well to form tight radii and shapes of all types. The Duck’s Bill tool handles finishing work. This tool comes with a flat side to complete straight surfaces and a rounded side for curved areas. Both tools are about three feet long with one-inch diameter steel handles that give you good control while forming materials.
Follower block and chuck selection
The follower blocks mount on the tailstock and hold the metal blank against the chuck during spinning. These blocks must be the same size as the chuck’s diameter. A block that’s too big won’t let tools make proper contact at the start, while one that’s too small will make the shell bottom buckle. Manufacturers make these blocks from materials like nylon, hard rubber, compressed fiber, aluminum, hardwood, or plywood. The chuck works as a one-piece die, either male or female, and teams up with the follower block and the spinning tool’s movement.
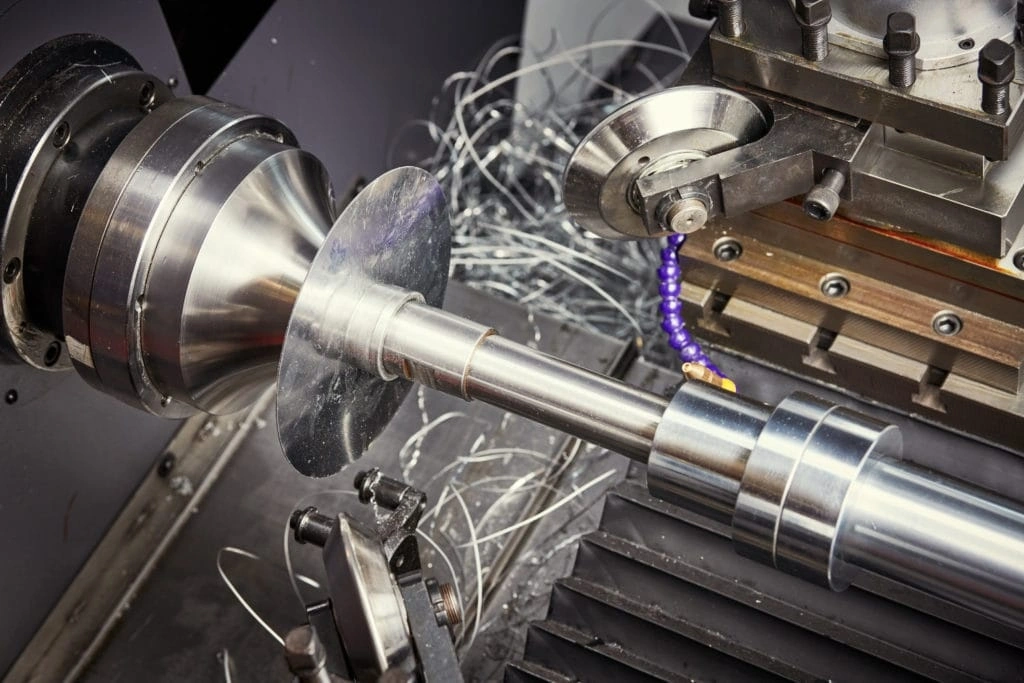
Best metals for spinning: 1100-0 aluminum, 304 stainless
Aluminum is the most popular choice for spinning, and 1100 aluminum leads the pack with its 99-99.95% aluminum content. This grade is easy to work with, naturally resists corrosion, and stays lightweight. When you need something stronger, 304 stainless steel fits the bill perfectly. This alloy contains 66.5-74% iron and 8.0-10.5% nickel. It resists corrosion better and offers impressive tensile strength from 580-1180 MPa compared to aluminum’s 86-170 MPa.
Lubricants: stick wax vs grease
Good lubrication cuts down friction between the spinning tool and workpiece. Metal hardness, spinning speed, and environmental conditions help determine the best choice. Harder metals like stainless steel work best with harder lubricants such as beeswax, paraffin, or stick wax. Aluminum and other soft metals prefer spinning soap, stick wax, or synthetic grease. The rule of thumb is simple: soft metals need soft lubricants, while faster speeds call for harder lubricants to work best.
Metal Spinning Process Step by Step
The metal spinning process changes flat sheet metal into hollow, symmetrical shapes through precise movements and techniques. Each step builds on the previous one and gradually shapes the metal to match the mandrel’s profile.
Centering and securing the metal blank
Precise centering is the lifeblood of successful metal spinning. The metal blank gets clamped between the mandrel and follower block. A slight misalignment can create defects, uneven wall thickness, or lead to complete failure. Operators can use a flat hardwood stick or a specialized centering tool against the pin on the T-rest while the lathe runs at low speed. They must loosen the tailstock pressure to make minor adjustments before final tightening.
Initial flaring and seating the part
After centering, the first crucial step creates a 1-inch flare around the edge. The spinner then pushes this section firmly against the mandrel until the top half-inch seats securely. A solid “drone” sound shows proper contact between the part and mandrel without gaps. This original seating stops slippage during later forming operations.
Forming motion: inside-out and outside-in strokes
The main forming technique uses short strokes that move from inside to outside and create a controlled “bump” ahead of the tool. The spinner smooths this bump from outside back inward with gentle pressure before moving forward. Material laying down onto the mandrel naturally forms another bump further out. These fluid movements continue rhythmically with consistent pressure throughout each pass.
Maintaining wall thickness and avoiding warping
Wall thickness stays nearly constant throughout conventional spinning. Multiple passes determine the final thickness. Forward roller movements cause thinning, while backward movements push metal in opposite directions to ensure consistency. A protective “rib” or bump ahead of the forming area prevents over-stretching and warping. Smooth, firm strokes or a slotted wooden stick pressed against the edge while rotating can fix any warbling along the edges.
Trimming and edge finishing techniques
Trimming creates clean, precise edges on spun components. Skilled operators trim edges within 1/64th of an inch using only sight and feel. The trimming tool features a square steel shaft with a diagonal cut at one end. Best results come from final trimming just before laying down the last flap of material. Edge finishing choices include straight trimming, beveling, or radiusing to handle parts safely.
Safety and Finishing Considerations

Safety plays a vital role in metal spinning, and you must pay careful attention to protect operators and ensure quality finished parts.
Protective gear and lathe safety
Metal spinning requires specific safety equipment. Safety glasses or face shields protect against flying debris and chips. Your feet need steel-toed safety footwear, and tight-fitting work clothes prevent dangerous tangles with rotating parts. You must remove all jewelry, tie back long hair, and avoid loose clothing – these rules cannot be broken.
Avoiding tool chatter and part ejection
Slender cutting tools, thin-walled workpieces, or wrong cutting settings often cause tool chatter. This self-exciting vibration ruins surface finish and makes tools wear faster. You can reduce chatter by using rigid tools, keeping tool overhangs short, and picking the right spindle speeds to minimize harmonics. The workpiece needs proper securing to prevent dangerous ejection during operation.
Burnishing and polishing on the lathe
Operators should never wrap emery cloth or polishing material completely around workpieces. Short pieces held between fingers work better, but never wrap them around your digits. You should never wear gloves during polishing – they increase friction and risk getting caught. Wooden holders or special polishing tools are safer options than holding materials by hand.
Final inspection for structural integrity
A thorough inspection will give you proper wall thickness uniformity and structural soundness. The right force distribution throughout the process helps prevent collapse or wrinkles. The piece usually gets burnished while mounted on the lathe, then undergoes a complete inspection to check dimensions and surface quality.
Conclusion
Metal spinning is both an age-old craft and a valuable modern manufacturing technique. The process revolutionizes flat metal sheets into complex, symmetrical parts through specialized equipment and skilled manipulation. This blend of artistry and precision engineering helps manufacturers create custom components quickly and efficiently.
In this piece, we’ve looked at everything you just need for successful metal spinning. The right equipment setup forms the foundations – from picking the right lathes to lining up mandrels with precision. Specialized tools like Sheep’s Nose and Duck’s Bill implements, paired with matching follower blocks and chucks, let craftsmen shape metals like 1100-0 aluminum and 304 stainless steel into desired forms.
The step-by-step spinning process needs careful attention. Proper centering, original flaring, and systematic forming motions create parts with consistent wall thickness and structural integrity. On top of that, it needs the right lubricants to reduce friction and achieve superior surface finishes.
Safety remains crucial throughout the whole ordeal. Protective gear, proper technique, and careful machine operation prevent accidents and ensure quality results. Final inspection, burnishing, and polishing complete the manufacturing cycle to create components that meet exact specifications.
Metal spinning has many advantages over other manufacturing methods. You just need minimal tooling costs for prototype development. The technique produces parts with exceptional strength-to-weight ratios and speeds up production once mastered. Experienced operators can complete most parts in five to ten minutes, making this process perfect for both small-batch specialty items and larger production runs.
Becoming skilled at metal spinning takes practice and patience. Operators must develop a feel for the material and learn to apply steady pressure while keeping proper tool angles. These skills are a great way to get complex, high-quality metal components that might otherwise require costlier manufacturing processes.
Metal spinning ended up as a perfect blend of traditional craftsmanship and modern industrial application. The techniques in this piece give manufacturers a clear path to add this versatile process to their production capabilities.
Key Takeaways
Master the fundamentals of metal spinning to efficiently transform flat metal sheets into complex, symmetrical parts through proper equipment setup and skilled technique.
• Precise mandrel alignment is critical – Even slight misalignment causes chatter, poor surface finish, and makes the process physically demanding for operators.
• Choose materials wisely for optimal results – 1100-0 aluminum offers excellent workability for beginners, while 304 stainless steel provides superior strength and corrosion resistance.
• Master the inside-out forming technique – Use short strokes moving from inside to outside, creating controlled “bumps” that are smoothed back inward to maintain consistent wall thickness.
• Safety gear and proper technique prevent accidents – Always wear safety glasses, steel-toed shoes, and tight-fitting clothing while avoiding gloves during polishing operations.
• Experienced operators achieve remarkable efficiency – Average parts can be completed in just 5-10 minutes, making metal spinning ideal for rapid prototyping and low-cost production runs.
The metal spinning process combines centuries-old craftsmanship with modern manufacturing precision, offering significant advantages in tooling costs, strength-to-weight ratios, and production speed for both prototype development and commercial manufacturing.
FAQs
Q1. What is metal spinning and how does it work? Metal spinning is a metalworking process where a disk or tube of metal is rotated at high speeds while being shaped into a symmetrical part. It involves using specialized tools to form the rotating metal against a mandrel, allowing for the creation of complex shapes with minimal tooling costs.
Q2. What are the advantages of metal spinning over other manufacturing methods? Metal spinning offers several advantages, including low tooling costs for prototyping, the ability to produce parts with high strength-to-weight ratios, and rapid production times. Experienced operators can complete most parts in just 5-10 minutes, making it ideal for both small-batch specialty items and larger production runs.
Q3. What materials are commonly used in metal spinning? The most popular materials for metal spinning are 1100-0 aluminum and 304 stainless steel. Aluminum is excellent for beginners due to its workability, while stainless steel offers superior strength and corrosion resistance for more demanding applications.
Q4. How important is proper equipment setup in metal spinning? Proper equipment setup is crucial for successful metal spinning. This includes selecting the right lathe, configuring the toolrest and toolpost correctly, and ensuring precise mandrel alignment. Even slight misalignments can lead to poor surface finish, uneven wall thickness, or complete failure of the spinning process.
Q5. What safety precautions should be taken during metal spinning? Safety is paramount in metal spinning. Operators should wear protective gear such as safety glasses or face shields, steel-toed safety footwear, and tight-fitting work attire. It’s also important to remove jewelry, secure long hair, and avoid loose clothing to prevent entanglement with rotating parts. Proper technique and vigilant machine operation are essential to prevent accidents and ensure quality results.