Metal Injection Molding (MIM) manufacturing has been the lifeblood of metal parts production for 40 years. This technology gives manufacturers the quickest way to create small, intricate components at scale. The manufacturing world is changing faster than ever. Metal 3D printing has reached a price point that makes it a match for MIM. This challenges MIM’s long-standing position in the market.
The comparison between MIM metal injection molding and newer additive methods reveals some interesting points. MIM shines at producing large quantities of small, complex parts with remarkable consistency. The original investment can be hefty, though—tooling costs range from $50,000 to $100,000. The economics of 3D printing vs traditional manufacturing tell a different story. Powder bed fusion machines might cost more than $500,000 and use materials that cost over $150/lb. These machines are a great way to get quick prototypes and flexible designs. On top of that, it saves materials – up to 97% of unused metal powder can be recycled. Parts can reach densities of 99.5%, beating investment casting.
Companies need to know the ins and outs of both MIM manufacturing and metal additive manufacturing to make smart production decisions. The right choice depends on production volume, part complexity, and how quickly you need to get to market. Let’s get into a detailed comparison of these technologies based on key performance metrics. This will help determine which approach works best for specific manufacturing needs.
How MIM and Metal 3D Printing Work
Metal Injection Molding (MIM) and metal 3D printing both create complex metal parts. These technologies work on completely different principles. A deeper look at these processes shows why each technology shines in specific manufacturing scenarios.
MIM Manufacturing Process: Feedstock to Sintering
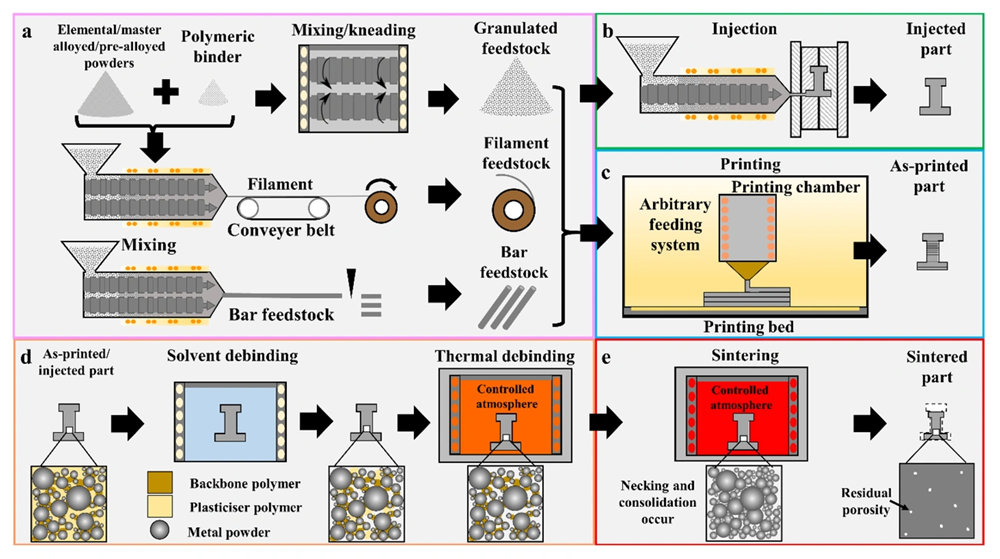
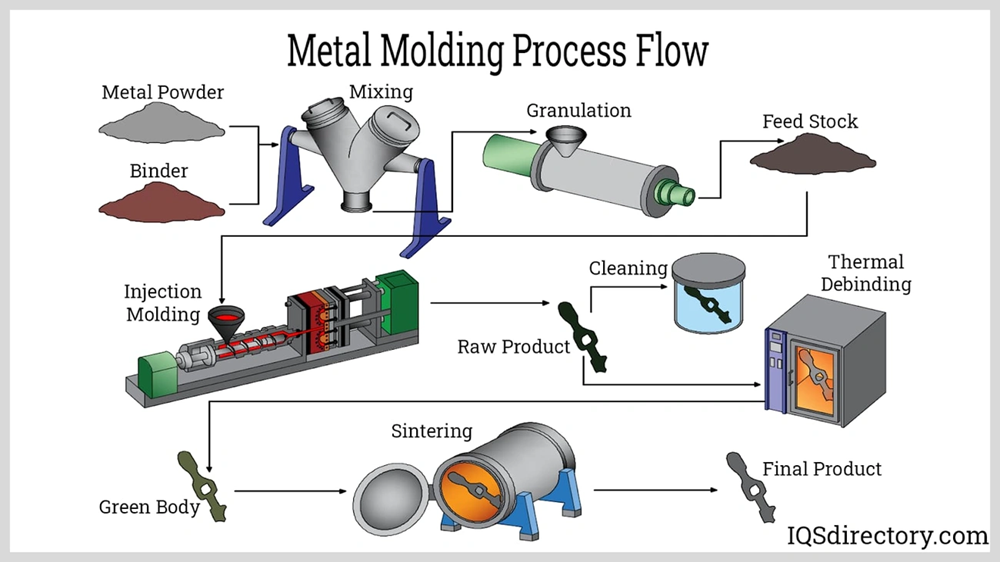
MIM manufacturing combines powder metallurgy with plastic injection molding techniques through four distinct stages. The process starts when manufacturers blend fine metal powders (typically less than 20 micrometers) with thermoplastic materials and wax binders to create feedstock. They heat and mechanically mix this combination until metal particles get a uniform coating. The mixture then cools down and turns into pellets.
The next step feeds these feedstock pellets into an injection molding machine. The machine heats them to about 200°C and injects them under pressure into mold cavities. This creates “green parts” that contain roughly 40% binder by volume. These parts are about 20% larger than their final size because they shrink during processing.
The process removes most binder materials from the green parts through catalytic processes, solvent extraction, or thermal techniques. This creates semi-porous “brown parts”. The final step takes these components through sintering in a controlled-atmosphere furnace. The temperature reaches about 85% of the metal’s melting point. The metal particles fuse, and the parts end up with densities that are a big deal, as it means that 97% of theoretical density.
Metal 3D Printing Process: Layer-by-Layer Construction
Metal 3D printing builds parts one layer at a time using different techniques. Powder bed fusion methods employ a laser system that melts thin layers of metal powder on a build platform. A new powder layer covers each completed layer. This pattern continues until the part reaches completion.
Metal binder jetting works differently. It puts a binding agent onto metal powder layers through inkjet nozzles. This creates “green parts” that need post-processing. Metal extrusion offers another option. This method pushes metal-polymer filaments through heated nozzles.
Most metal 3D printing methods need post-processing. Parts go through heat treatment, support removal, and surface finishing to get their final properties.
Key Differences in Workflow and Setup
These technologies differ mainly in their production approach. MIM needs custom tooling for each part design. The original mold creation takes several weeks or months. Metal 3D printing skips this step and works straight from CAD files without part-specific tooling.
MIM proves its worth in batch production. Each injection cycle takes just seconds once tooling is ready. Metal 3D printing creates individual parts layer-by-layer. This makes it perfect for prototyping or low-volume production but less cost-effective for mass manufacturing.
Design limitations vary between the two methods. MIM parts must allow for mold ejection. This limits internal features and requires consistent wall thickness. Metal 3D printing gives designers more freedom. Yet they still need to think over support structures, minimum wall thicknesses, and build orientation.
Pros and Cons of MIM
Manufacturing professionals choose MIM metal injection molding because it offers unique benefits, though it comes with certain limitations. A clear understanding of these strengths and weaknesses helps companies determine where this technology fits in their production plans.
High Volume Efficiency and Cost Reduction
MIM shows remarkable cost savings as production numbers increase. The process becomes economically viable around 5,000 units, with the best pricing achieved above 20,000 annual units. Its highly automated nature cuts labor needs substantially compared to traditional metalworking methods.
The process saves materials effectively – traditional machining wastes 30-40% as chips and scrap, while MIM operates with under 5% waste. MIM parts need minimal secondary machining and save up to 90% on finishing costs when compared to conventional methods.
Material Versatility in MIM
MIM manufacturing’s strength lies in its material flexibility. The technology works with a variety of alloys, from stainless steels and low-alloy steels to tool steels, copper alloys, and titanium alloys. Manufacturers have created over 85 custom MIM materials that meet specific customer needs.
These materials show exceptional mechanical properties like high tensile strength, hardness, and dimensional stability. MIM successfully forms complex and high-melting-point metals such as cobalt alloys, tungsten alloy, and tool steel – materials that other methods struggle to process.
Design Constraints Due to Mold Requirements
MIM’s versatility comes with size limitations. The process works best for components within 2 inches (50mm), though some manufacturers can make parts up to 10 inches (250mm). Larger dimensions make it harder to achieve uniform density.
Each design needs its mold, which limits flexibility. Design changes require new molds once tooling is set, affecting production timelines and costs directly.
Original Tooling Costs and Lead Times
Upfront investment remains MIM’s biggest barrier. Professional injection molding equipment costs range from $50,000 to $200,000, while individual molds cost between $30,000 and $70,000. Mold prices vary widely – similar molds can cost anywhere from $27,000 to $70,000.
Lead times create additional challenges. New mold creation and production setup takes 8-12 weeks. Only half of all MIM molds ever reach production, which shows why careful planning matters before investing.
Pros and Cons of Metal 3D Printing
Metal additive manufacturing technologies have unique features that are completely different from traditional processes like MIM. Manufacturers need to know both the advantages and drawbacks to pick the right process for their needs.
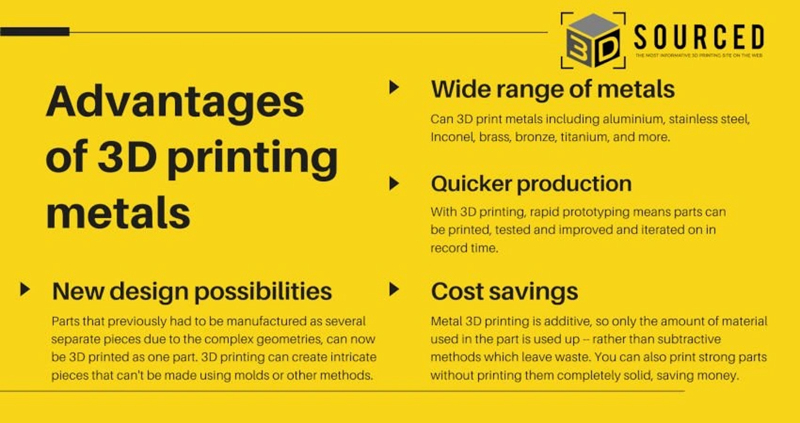
Design Freedom and Rapid Prototyping
Metal 3D printing creates design possibilities that traditional methods simply can’t match. The technology shines when creating complex internal geometries and controlling density precisely. This allows advanced features like cooling channels that run right under part surfaces.
Designers can now create organic shapes and interlocking parts that look just like natural structures. Parts can be optimized for the best strength-to-weight ratios, which boosts performance and uses less material. Complex assemblies can now be combined into single parts, which streamlines production and makes parts last longer.
Metal 3D printing speeds up product development cycles. There’s no need for tooling, so prototyping becomes quick and cost-effective. Teams can test multiple versions rapidly. Products reach the market faster, which can boost revenue.
Reduced Waste and Sustainability Benefits
Metal 3D printing is much better for the environment than traditional manufacturing. The layer-by-layer building process uses only the material needed, creating much less waste than cutting-based methods. Some systems can reuse all recovered metal powder, which cuts down waste even more.
Lightweight designs reduce material use and save energy throughout the product’s life. Research shows that metal binder jetting cuts environmental impact by up to 69% compared to laser powder bed fusion and 62% compared to injection molding for small to medium runs.
Surface Finish and Post-Processing Needs
Metal 3D printed parts need quite a bit of post-processing. Fresh-printed surfaces feel rough like cast iron, which limits their direct use. Layer thickness affects surface roughness – faster prints mean rougher surfaces.
Post-processing makes up about 27% of metal AM printing costs. Parts need powder removal, support structure removal, stress relief, and surface finishing. High-precision parts might need extra machining to meet tight tolerances of ±0.001 inches (0.0254mm).
Material Limitations and Cost per Part
Metal 3D printing works with aluminum, titanium, stainless steel, and superalloys, but material choices are nowhere near what traditional methods offer. Standard powders cost $300-$600 per kilogram, while special materials can reach $2,000-$4,000 per kilogram.
Machine time usually costs more than materials for individual parts. Complex parts with less material can be cheaper to print than solid ones because the laser travels less. Right now, a typical metal 3D printed part costs $5,000-$10,000 to print and finish. These economics work best for low-volume production or when better performance justifies higher costs.
Comparing MIM and 3D Printing Across Key Metrics
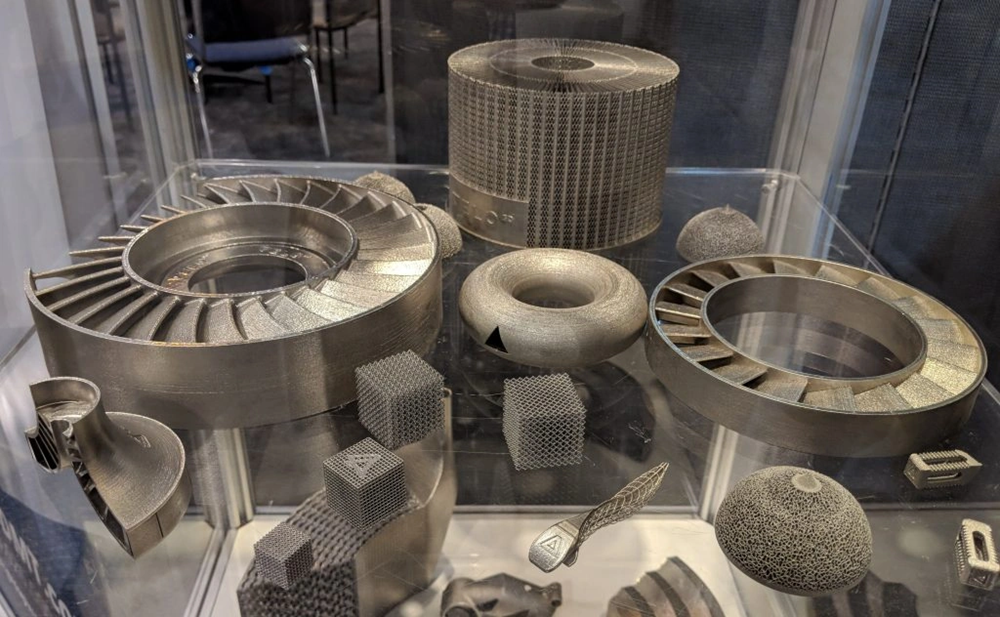
A detailed comparison between MIM and metal 3D printing shows clear performance differences in key manufacturing parameters. These technologies shine in different areas based on what you need to produce.
Production Speed: Batch Molding vs Layer Printing
The manufacturing timeline tells an interesting story about these technologies. The MIM manufacturing process needs several weeks to create molds before production starts. 3D printing begins right after you complete the design. MIM’s parts take just seconds to make once the tooling is ready. A typical 3D printed part needs several hours or even a full day. MIM’s ability to produce multiple parts at once makes it faster than 3D printing for established designs.
Cost Efficiency: High Volume vs Low Volume
Production quantity determines which technology costs less. 3D printing saves money for batches under 10,000 units. MIM manufacturing becomes a better value beyond this point. The sweet spot lies somewhere between 20,000-30,000 units per year. This is when MIM becomes more affordable. MIM’s original tooling investment ($50,000-$100,000) is a big hurdle. In spite of that, the cost per part stays minimal once tooling is complete.
Mechanical Properties: Density and Strength
Both technologies create parts with similar material properties. MIM parts reach densities above 97%, while metal 3D printed parts can hit 98% density. Lab tests on 17-4PH stainless steel show that both methods meet industry standards. MIM parts have slightly better ductility (14% vs. 10.3% elongation). Heat-resistant applications usually work better with MIM components.
Surface Finish: Molded vs Printed Textures
Surface quality makes a big difference between these technologies. MIM creates smoother surfaces with roughness values of 0.8-1.6 Ra. 3D printing leaves visible layer lines that need extra work. Tests show that surface treatments can improve 3D printed parts’ smoothness nine times over. MIM parts improve three times with similar treatments. This means MIM parts need less work to get production-ready surfaces.
Design Complexity: Molded Shapes vs Lattice Structures
Design freedom varies greatly between these methods. MIM needs draft angles to remove parts and doesn’t deal very well with undercuts or complex internal features. 3D printing gives you almost unlimited geometric freedom. This works especially well for lattice structures, hollow shapes, and bionic geometries. 3D printing excels at creating complex internal structures that molding can’t achieve. This advantage stands out when you have parts needing topology optimization or conformal cooling channels.
Comparison Table
| Characteristic | Metal Injection Molding (MIM) | Metal 3D Printing |
|---|---|---|
| Original Setup Cost | $50,000-$200,000 for equipment + $30,000-$70,000 for molds | Upwards of $500,000 for powder bed fusion machines |
| Material Cost | Lower material costs | $300-$600/kg for standard powders; $2,000-$4,000/kg for specialized materials |
| Production Volume Sweet Spot | >20,000 units annually | Low volume production, prototyping |
| Production Speed | Seconds per part after tooling completion | Several hours to a full day per part |
| Setup Time | 8-12 weeks for mold creation | Immediate start after design completion |
| Material Density | >97% of theoretical density | Up to 99.5% density |
| Surface Finish | 0.8-1.6 Ra roughness | Rougher surface, requires more post-processing |
| Design Freedom | Limited by mold requirements; requires draft angles; limited internal features | High geometric freedom; complex internal structures possible |
| Size Limitations | Optimal within 2 inches (50mm), max up to 10 inches (250mm) | Not specifically mentioned |
| Material Waste | <5% material waste | Up to 97% of unused powder recyclable |
| Post-Processing Needs | Minimal secondary machining | Substantial post-processing (27% of costs) |
| Design Changes | Requires new molds, expensive to modify | Easy modifications via CAD files |
| Material Options | Wide range including stainless steels, low-alloy steels, tool steels, copper alloys, titanium alloys | More limited selection including aluminum, titanium, stainless steel, superalloys |
| Typical Part Cost | Economical at high volumes | $5,000-$10,000 per part |
Conclusion
Metal Injection Molding and 3D metal printing work as complementary technologies rather than competing directly. Each method excels in different manufacturing scenarios, and choosing between them depends on specific production needs.
MIM shows clear advantages when manufacturing volumes exceed 20,000 units yearly. Companies that need consistent production of small, complex metal components will benefit from MIM’s material efficiency, alloy options, and surface finish quality. All the same, heavy tooling investments and long setup times make design changes difficult.
3D metal printing proves most valuable during product development and small production runs. This technology needs no tooling, speeds up prototyping, and creates complex geometries that traditional manufacturing can’t match. These benefits come with slower production, higher unit costs, and more post-processing needs.
Production volume remains the main factor when choosing between these technologies. Higher quantities make MIM more affordable, while 3D printing costs less for limited runs. Part complexity serves as another vital consideration. 3D printing creates internal lattices and optimized shapes better, while MIM delivers smoother external surfaces with less post-processing.
Smart manufacturers now make use of both technologies throughout their product’s lifecycle. Many companies use 3D printing to prototype and test before switching to MIM once designs become stable and volumes increase. This combined approach helps products reach markets faster while keeping long-term costs down.
While MIM leads in mass production of metal components, 3D printing technology advances faster every day. Better print speeds, materials, and surface quality will without doubt reduce the gap between these technologies. The manufacturing world benefits from both options, letting companies pick the best process based on their volume, complexity, timeline, and budget needs.
FAQs
Q1. What are the main disadvantages of metal 3D printing? Metal 3D printing can result in higher porosity, which may lead to reduced material density and potential issues like cracking and fatigue. It also typically requires substantial post-processing, has higher material costs, and slower production speeds compared to traditional methods.
Q2. When is metal 3D printing a cost-effective option? Metal 3D printing is most cost-effective for low to medium volume production runs, typically under 10,000 units. It’s particularly valuable for rapid prototyping, complex geometries, and when design flexibility is crucial. However, for high-volume production, other manufacturing methods often become more economical.
Q3. What is the typical cost range for MIM tooling? MIM tooling costs can range from $50,000 to $100,000, which includes the cost of creating the molds. This significant upfront investment can be a barrier for low-volume production but becomes more cost-effective as production quantities increase.
Q4. How does 3D printing compare to conventional manufacturing in terms of speed and materials? 3D printing is generally faster for producing small to medium-sized objects, especially when considering the time needed to create tooling for traditional methods. However, conventional manufacturing offers a wider range of material options and is typically more efficient for high-volume production.
Q5. What are the key factors to consider when choosing between MIM and metal 3D printing? The main factors to consider are production volume, part complexity, timeline, and budget. MIM is more suitable for high-volume production (over 20,000 units annually) and parts with smooth external surfaces. Metal 3D printing excels in low-volume production, rapid prototyping, and creating complex internal structures. The choice also depends on the specific material requirements and the need for design flexibility.
