The Vickers hardness test ranks among the most adaptable methods to measure material hardness. It can test materials from soft objects at 8 HV to materials as hard as 2000 HV. Robert L. Smith and George E. Sandland at Vickers Ltd developed this test in 1921 as an alternative to the Brinell method. Their innovation has become essential in materials science and engineering.
The Vickers hardness test’s value comes from its capability to measure any test force under ISO standards (HV 0.01, HV 1, and HV 10). The test uses a 136° pyramidal diamond indenter that leaves a square indent in the tested material. The test works on almost all metals and has one of the widest measurement scales available. Materials from 316L stainless steel at 140HV30 to diamond at 10000HV can be tested reliably with this technique.
This piece covers every aspect of the Vickers hardness test procedure, from simple setup to expert-level execution. You’ll learn the right way to prepare samples, configure machines, conduct tests precisely, and interpret results. The guide also compares different hardness tests to help you pick the best method for your specific needs.
Preparing for the Vickers Hardness Test

Image Source: Struers.com
Getting the preparation right lays the groundwork for accurate Vickers hardness testing results. The test’s success depends on several factors that need careful attention to ensure precise and repeatable measurements.
Choosing the Right Load Based on Material Type
The test load you pick plays a big role in how accurate your Vickers hardness measurements will be. Higher loads give more consistent results because they reduce the effects of surface treatments and metallographic structure. Most experts suggest using the highest possible test force to get better measurement results.
Your load choice depends on these factors:
- Material Type: You’ll need higher test loads for harder materials.
- Material Thickness: Lighter loads work better with thinner materials to avoid damage.
- Desired Indentation Size: Bigger indentations show material properties better and have fewer measurement errors.
Vickers testing loads come in three categories:
- Macro Range (49.03N/5kgf to 980.7N/100kgf): Standard hardness testing where values don’t change with test load.
- Micro Range (1.961N/0.2kgf to 29.42N/3kgf): Perfect for thin surface layers, sheet metals, and finished parts.
- Nano Range (0.098N/0.01kgf to 1.961N/0.2kgf): Used only for special cases that need very light loads.
Industry standards provide recommended load values for specific materials and applications. Note that you should always report hardness values with the load used, like “440HV30” showing a 30kgf test load.
Surface Polishing and Sample Thickness Guidelines
Surface preparation makes a huge difference because Vickers hardness testing uses optical measurement of indentations. Bad surface quality can throw off your measurements, especially with lower test loads and smaller indentations.
These surface preparation guidelines will help you get the best results:
- Surface Treatment: Polish or precision grind your specimen surface based on whether you’re doing micro-hardness or macro-hardness testing.
- Polishing Level: Lower test loads need better polishing quality.
- Sample Mounting: Your specimens need rigid clamping on a support platform because any movement can mess up accuracy.
Your sample thickness must be at least 1.5 times the indentation diagonal length. This means you need specimens between 0.085mm and 6.5mm thick, depending on material hardness and test load. Thin materials might bulge on the other side if they’re too thin, which ruins your test results.
Spacing matters too. Steel and copper samples need indentations spaced at least three times the diagonal length apart Softer metals like aluminum, lead, tin, and zinc need six times the diagonal length. The distance from any indentation to the specimen’s edge should be 2.5 times the diagonal length, or 3 times for softer metals.
Avoiding Substrate Effects in Thin Samples
Testing thin films or coatings comes with its challenges because substrate effects can mess up your hardness measurements. Your indentation depth shouldn’t go deeper than 10% of the film thickness to avoid substrate influence.
This 10-15% rule becomes crucial for super thin films (less than ten nanometers). The composite response can stray far from the film’s actual properties if you go deeper. When shallow indentations aren’t practical, try these approaches:
- Specialized Analysis Methods: Test at deeper indentations and use math to separate film and substrate effects.
- Mathematical Functions: Use α(hc/t) functions to match experimental composite hardness results with relative contact indentation depth.
- Instrumented Indentation Testing: Advanced testing methods can measure both hardness and elastic modulus in one go.
Surface preparation becomes extra important with very low indentation depths. Surface roughness and indenter geometric imperfections have a bigger impact at this scale. That’s why you need to pay special attention to surface polishing when testing thin films.
Setting Up the Vickers Hardness Test Machine
A well-set-up Vickers hardness test machine is the foundation of accurate hardness measurement. The equipment has several vital parts: a diamond pyramid indenter, a load application system, a test anvil, an optical measuring system, and a specimen holder. The right setup of these components will give reliable and consistent results.
Aligning the Indenter and Sample
The indenter and test specimen need perfect alignment to get accurate measurements. You should place the prepared sample on the test machine’s profile sleeve. Many new machines come with special specimen grips that work with samples of all types, including embedded specimens.
To line up properly:
- Position the sample securely on the anvil
- Insert restraining pins into the designated holes that sit against the shoulders or stops on both sides [4]
- Compress the specimen by applying pressure on the thumb wheel until it makes contact with the indenter
The sample needs to stay perfectly straight against the indenter axis. Any tilt or misalignment creates uneven indentations that lead to measurement errors. Most modern Vickers hardness testers now have collision protection systems that prevent damage to indenters and objectives from operator mistakes.
Configuring Load Duration (10–15s)
Vickers hardness test timing needs specific settings to keep measurements consistent. ISO standards require careful control of load application and dwell time:
- Load Application Time: The test force should rise from 0 to its final value within 7 seconds to reduce measurement uncertainty. You can take 2 to 8 seconds, but 7 seconds works best.
- Dwell Time: The load needs to stay constant once fully applied. Standard dwell time runs between 10 to 15 seconds, with 14 seconds being ideal. This steady holding period lets the indenter fully penetrate the material and create clear indentations.
Different dwell times must appear in the hardness value report. For instance, “610 HV 10/30” shows a 30-second dwell time with a 10 kg load.
Ensuring Optical System Calibration
The Vickers test measures indentation through optical readings rather than direct depth. This makes proper optical system calibration vital.
To get accurate optical measurements:
- Calibrate the measuring microscope using certified reference scales
- Check the optical system’s magnification accuracy
- Make sure the lighting clearly shows indentation boundaries
- Use Vickers hardness test blocks to adjust the tester before starting
New Vickers hardness testers often come with built-in optical systems that measure indentations automatically. These systems have measurement objectives and bright field cameras that help navigate and scan samples. The optical measuring device plays a crucial role since you can’t determine test results accurately without it.
High-volume testing labs can run up to 150 indentations and measurements hourly (with 10 seconds dwell time) using automated test programs. These systems boost throughput and keep measurements consistent by reducing operator differences.
The optical evaluation makes Vickers hardness testers more expensive than basic options like Rockwell testers [3]. But the Vickers method’s precision and versatility with materials of all types make it worth the extra cost.
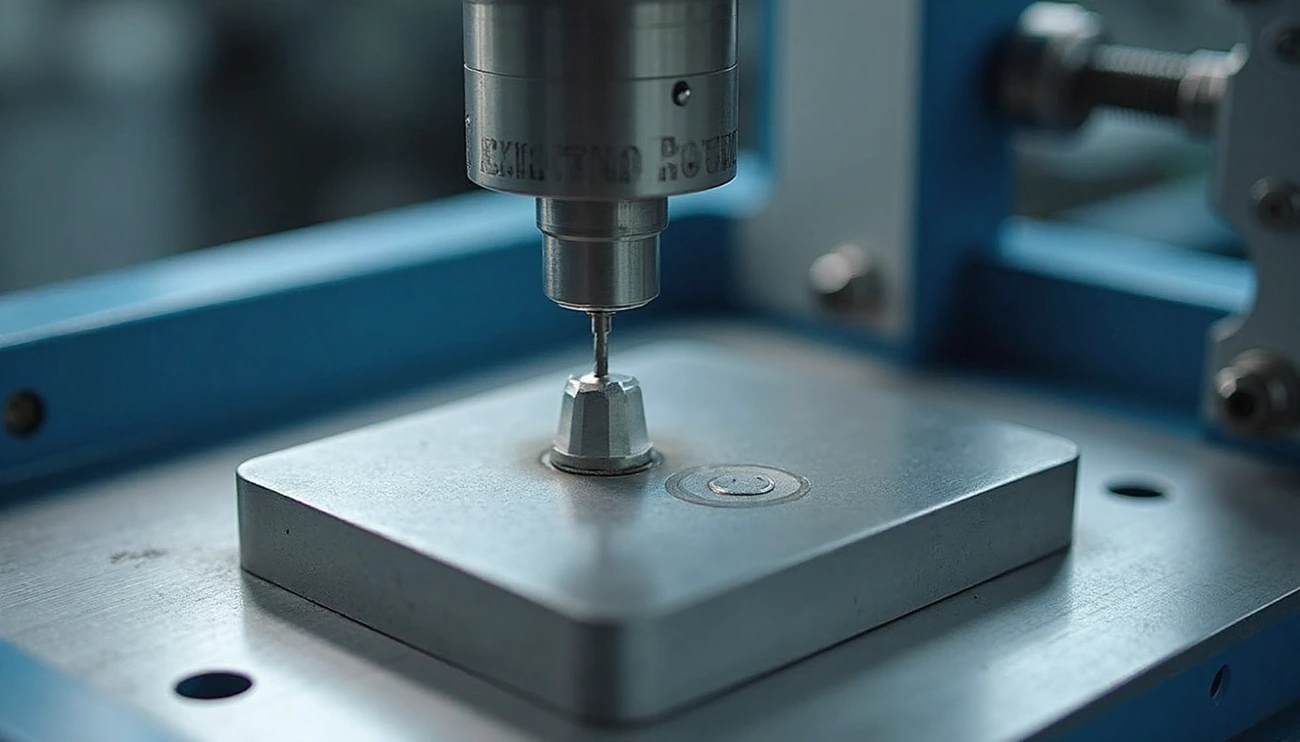
Executing the Test with Precision
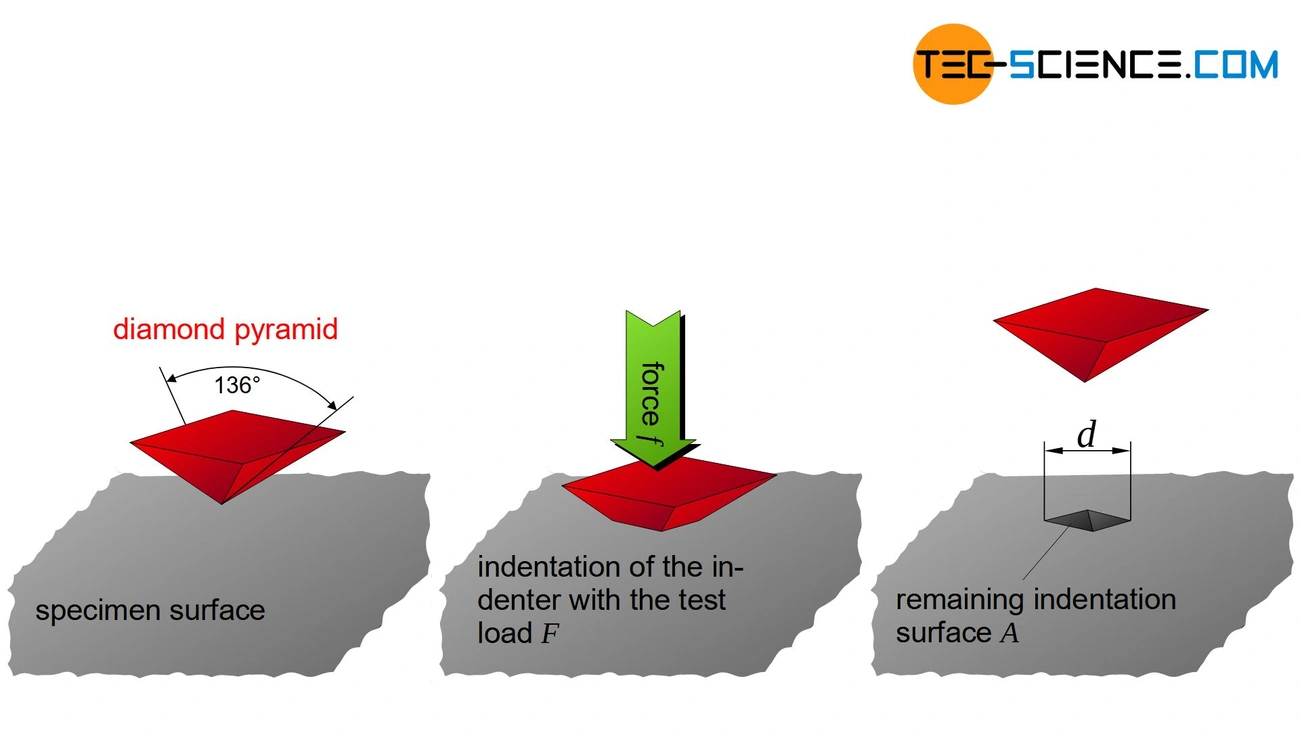
Image Source: tec-science
The quality of Vickers hardness test results depends on how precisely you execute them. After completing preparation and machine setup, you need to pay close attention to the testing procedure to characterize materials accurately.
Indentation Process and Load Application
The Vickers hardness test employs a diamond indenter that’s shaped like a square-based pyramid. It has a 136° angle between opposite faces. This unique geometry creates a square impression. The diagonal measurements of this impression are the foundations of hardness calculations.
Here’s the quickest way to perform the test:
- Place the specimen under the indenter at right angles to avoid uneven impressions
- Apply the load smoothly without impact – usually between 1 to 100 kgf based on material properties
- Keep the full load steady for 10 to 15 seconds
- Take off the load completely
The timing of load application substantially affects measurement accuracy. The test force should increase from zero to its final value within 7 seconds. This precise timing reduces uncertainty and allows enough penetration to create clear indentations.
Measuring Diagonals and Averaging
The indentation stays permanently on the material surface after load removal. You must measure this impression with precision:
A microscope helps measure the two diagonals of the square indentation. You should take these measurements to the nearest 0.1μm for best results. The final step involves calculating the arithmetic mean of both diagonals.
Different indentation sizes need different levels of measurement precision:
- Indentations smaller than 20 μm: measure diagonals within 0.1 μm
- Indentations between 20-40 μm: measure diagonals within 0.25 μm
- Larger indentations: measure diagonals within 0.5 μm
Look out for signs of improper testing during measurement. The test surface might not be perpendicular to the indenter axis if one diagonal half is 5% longer than the other, or if the corners look blurry.
Avoiding Indentation Size Effect (ISE)
ISE presents a common challenge in Vickers hardness testing. Tests with very low loads often show higher hardness values compared to higher loads on similar materials.
This happens because:
- Surface effects become more important at very low loads
- Microscopic material structure can differ from bulk properties
- Smaller indentations show more pronounced elastic recovery effects
You can minimize ISE’s influence by keeping Vickers values independent of the test force. Use loads of at least 200 gf when possible. Sometimes you’ll need lower loads for thin specimens or surface testing. Remember that smaller indentations might give slightly higher hardness values – this knowledge is vital for correct interpretation.
The space between indentations needs to be enough to prevent interference. Most standards suggest keeping separate tests at least 2.5 times the diagonal length apart. This stops work-hardened zones from affecting nearby measurements.
By being precise and following these steps carefully, technicians can achieve the outstanding accuracy that makes the Vickers hardness test one of the most reliable material testing methods.
Calculating and Reporting Vickers Hardness Number
Image Source: nhatvietindustry.com.vn
The accuracy of Vickers hardness values depends on precise measurement of indentation diagonals followed by careful calculations. This testing method’s mathematical principles are the foundations of consistent results. The versatility makes it one of the most widely used hardness testing approaches in a variety of materials.
Using HV = 1.8544F/d² for kgf/mm²
The Vickers hardness number represents the quotient you get by dividing the applied load by the indentation’s surface area. A mathematical formula expresses this relationship:
HV = 1.8544 × F/d²
The formula uses F as the load applied in kilogram-force (kgf), and d represents the arithmetic mean of two measured diagonals (d₁ and d₂) in millimeters. The constant 1.8544 comes from the indenter’s 136° pyramidal angle geometric relationship, specifically from A = d²/(2sin(136°/2)), which simplifies to A ≈ d²/1.8544.
The formula gives values in kgf/mm², but standard practice requires reporting Vickers hardness as dimensionless numbers. This prevents confusion when comparing results from different testing environments. The calculated HV value matches the hardness in kgf/mm² without any unit conversion [11].
Conversion tables make calculations easier, but knowing the basic formula helps troubleshoot unusual results or adapt to non-standard testing conditions.
SI Unit Conversion: HV to MPa and GPa
Academic and research publications now trend toward reporting Vickers hardness in SI units. Converting traditional HV values to SI units needs two multiplication factors:
- To convert HV to MPa: multiply by 9.807
- To convert HV to GPa: multiply by 0.009807
These factors help transform kilogram-force to newtons and square millimeters to square meters. A single kgf/mm² equals 9.80665×10⁶ Pa.
Engineers and technicians prefer traditional dimensionless HV values despite SI unit reporting scientific consistency. ASTM suggests a “soft” metric approach that keeps familiar values instead of strict SI units that industry professionals might find less intuitive
A material with 100 HV hardness would equal approximately 980.7 MPa. These conversions help correlate hardness with other mechanical properties typically shown in SI units.
Reporting Format: e.g., 440HV30/20
The standardized notation for Vickers hardness results uses a specific format that shows test parameters with the hardness value. The format looks like:
xxxHVyy or xxxHVyy/zz
This notation includes:
- xxx: the numerical hardness value
- HV: indicates “Hardness Vickers” testing method
- yy: the applied test load in kgf
- zz: (optional) dwell time in seconds, shown only when different from standard 10-15 seconds [12]
“440HV30” shows a hardness value of 440, tested at 30 kgf load with standard dwell time. “610HV10/30” means a hardness of 610, tested with a 10 kgf load for 30 seconds.
This format ensures test conditions stay with the results. This allows accurate comparisons between measurements done under different circumstances. Similar materials might show slight variations in hardness values with different loads due to the indentation size effect covered earlier.
Quality control procedures need proper documentation of test parameters through this notation. This allows other facilities to reproduce and verify results over time.
Interpreting Results and Material Properties
Image Source: ResearchGate
Vickers hardness results tell us much more than just numbers. These values help us understand how materials behave under different conditions.
Estimating Ultimate Tensile Strength (σu ≈ HV/3)
Engineers can estimate ultimate tensile strength quickly with Vickers hardness test results instead of destructive tensile testing. The relationship follows a simple formula:
σu ≈ HV/3
The tensile strength equals HV divided by 3 when HV is in MPa. Work-hardening behavior creates this correlation, which depends on yield strength, Poisson’s ratio, and geometric factors.
Carbon steels follow an even more accurate formula:
Ultimate Tensile Strength ≈ 3.3 × Vickers Hardness
Quality control teams use this quick calculation method to check material properties without extra testing.
Microstructure Influence on Hardness
Materials resist localized deformation based on their hardness. Several microstructural features affect hardness values:
- Grain Size: Materials with finer equiaxed grains show higher hardness values
- Precipitate Distribution: Heat-treatable alloys’ hardness depends more on precipitate arrangement than grain structure
- Phase Separation: Silica-rich regions can change material hardness through the “weakest link” principle
Hardness measures resistance to irreversible plastic deformations at large strains. Both internal factors (chemical bonding, crystal structure) and external parameters (grain size, interfaces) determine the final hardness values.
Hardness Limits for Weld Qualification (e.g., 380HV)
Hardness testing plays a crucial role in welding quality control. Welding codes set specific maximum hardness limits:
- 380HV: Standard maximum allowed for weld procedure qualification to prevent hydrogen cracking
- 248-250HV: Root welds exposed to sour products need this lower limit to prevent sulfide stress corrosion cracking
These limits help prevent brittle microstructures that could lead to hydrogen cracking. Reliable weld hardness measurements need proper sample preparation. Cutting methods and polishing pressure can create work hardening that changes results.
Comparing Vickers with Other Hardness Testing Methods
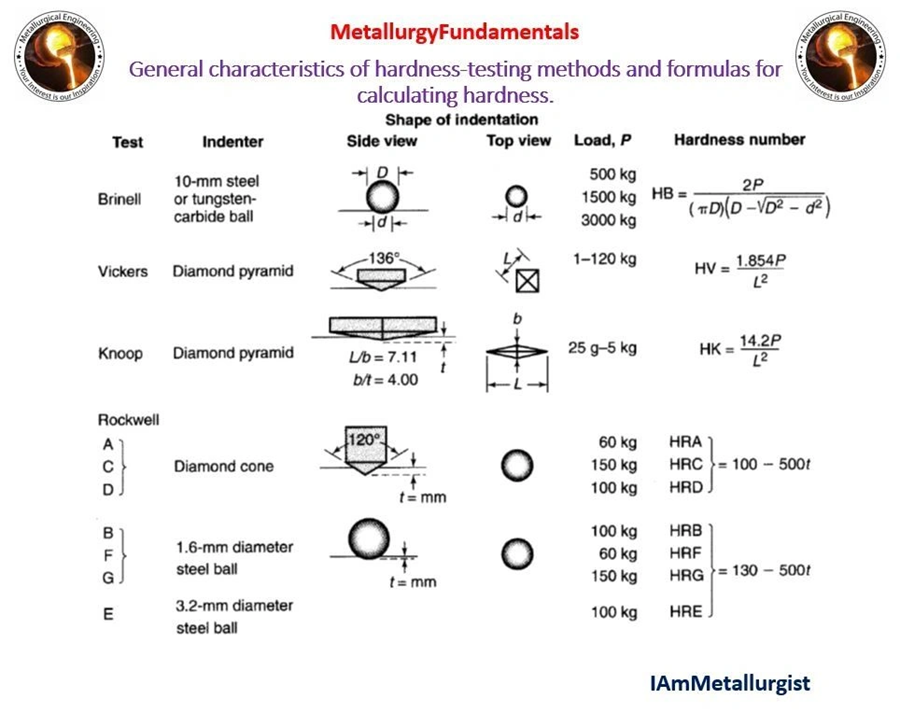
Engineers need to know the differences between hardness testing methods to pick the right technique for their materials and applications. Each method has its strengths and limits that shape how people use them.
Brinell vs Vickers: Indenter and Load Differences
Brinell tests use a spherical ball indenter (typically 1-10mm diameter) and heavy loads up to 3,000 kg. This creates bigger indentations that work well with materials that have coarse grain or rough surfaces. The Vickers test takes a different approach with its diamond pyramid indenter that makes smaller, more precise impressions under lighter loads.
Brinell testing works best with softer materials like non-ferrous metals, castings, and some steels. The bigger indentation area gives average hardness values across a material’s grains and reduces the impact of surface irregularities. All the same, this method leaves larger permanent marks, takes longer to test, and won’t work with fully hardened steel.
Vickers testing gives more flexibility with materials of any hardness. The measurement range is a big deal as it means that Vickers can test materials beyond Brinell’s practical limit of 700-750 HB.
Rockwell vs Vickers: Depth vs Area Measurement
These methods measure hardness in completely different ways. Rockwell looks at how deep the indentation goes after applying and releasing a load. Vickers calculates hardness by measuring the surface area of the indentation using diagonal measurements.
Rockwell testing has several practical benefits:
- Quick results with minimal prep work
- Hardness readings without extra equipment
- Better handling of rough surfaces
Vickers testing takes longer but gives more accurate results. It uses an optical measurement system that can magnify specific microstructural elements. This precision requires better surface prep, more time, and costlier equipment.
When to Use Microhardness vs Macrohardness
Microhardness testing uses lower loads (from a few grams to a few kilograms) to make smaller indentations measured under high magnification. This method is perfect for:
- Testing thin materials or coatings
- Looking at small or localized areas
- Measuring individual microstructures
- Creating hardness profiles through case-hardened components
Macro hardness testing uses heavier loads to assess bulk materials. Methods like Rockwell or Brinell work well for macro applications because they can apply heavier loads and make larger indentations.
The choice ended up depending on your specific needs. Pick Vickers for precision with small samples, Brinell for large or uneven specimens, and Rockwell for quick industrial testing.
Conclusion
This piece has given a complete explanation of the Vickers hardness test. We’ve covered everything from basic principles to advanced uses. The test’s versatility makes it special. It measures hardness from soft materials at 8 HV all the way to very hard ones at 2000 HV.
Good preparation is the lifeblood of accurate testing. Surface polishing, the right load choice, and sample thickness all affect how reliable the results are. The machine must be set up right. The testing steps need careful attention to get results you can trust.
Standard formulas turn indentation measurements into real hardness values. These numbers tell us much more than just how a material resists indentation. Take tensile strength estimation – it shows how hardness data becomes useful engineering information.
The Vickers test has clear advantages over other methods. Brinell tests work better on rough surfaces. Rockwell gives faster results. But Vickers testing is more precise with materials of all types. That’s why scientists and engineers have used it for over 100 years.
Today’s manufacturing still relies on hardness testing to control quality. The methods in this piece are vital knowledge for anyone working with materials. Engineers who understand these techniques can pick the right tests, read results correctly, and make smart choices about materials.
Becoming skilled at the Vickers hardness test gives professionals a great tool to evaluate materials. Whether you’re testing welds, analyzing thin films, or studying bulk materials, these methods help create reliable data. This data then guides engineering decisions in many industries.
FAQs
Q1. What are the key steps in performing a Vickers hardness test? The Vickers hardness test involves pressing a diamond pyramid indenter into the material, removing the load, and measuring the diagonals of the resulting indentation. The hardness number is then calculated by dividing the load by the surface area of the indentation.
Q2. What precautions should be taken during Vickers hardness testing? Important precautions include maintaining minimum distances between indentations and from indentations to specimen edges to avoid interaction between work-hardened regions. Proper surface preparation and perpendicular alignment of the sample to the indenter are also crucial.
Q3. How is the appropriate load selected for a Vickers hardness test? Load selection depends on the material being tested and the desired indentation size. The test is divided into micro, low, and macro load ranges. Generally, higher loads are used for harder materials and to produce larger, more representative indentations.
Q4. What is the typical range of Vickers hardness values? Vickers hardness values typically range from 1 to 3000 HV, depending on the test force and specimen material. This wide range allows for testing of materials from very soft to extremely hard.
Q5. How does the Vickers test compare to other hardness testing methods? The Vickers test offers greater versatility and precision compared to methods like Brinell or Rockwell. It can be used on almost all materials and provides accurate results for both micro and macro hardness testing. However, it requires more careful surface preparation and takes longer to perform than some other methods.