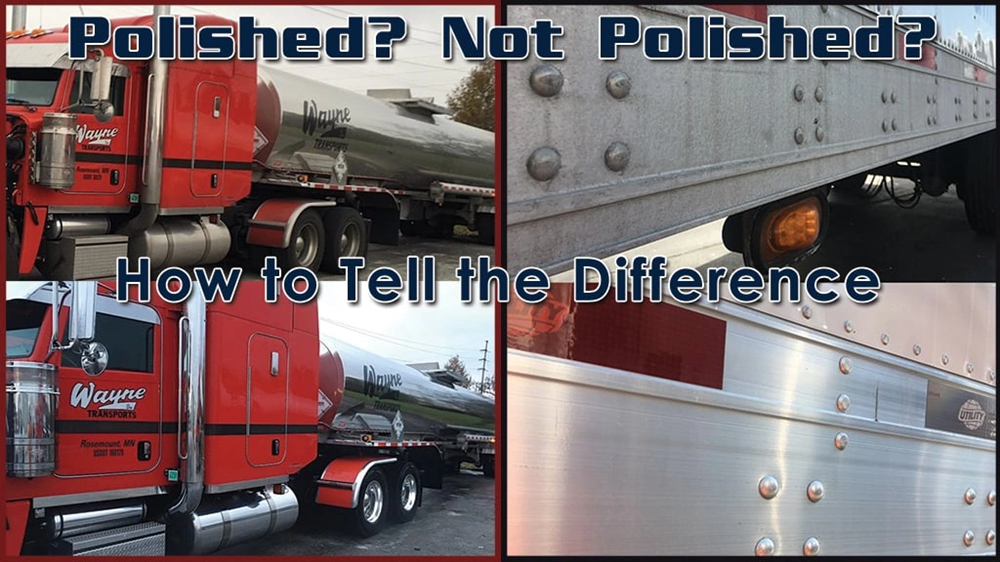
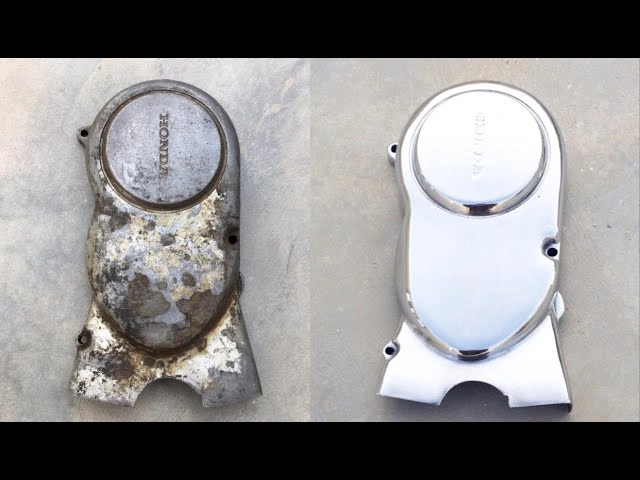
Aluminum polishing can turn dull, whitened metal surfaces into mirror-like finishes that grab attention. Aluminum’s porous nature makes it absorb industrial fallout, grime, brake dust, and other contaminants that speed up erosion. The metal dries out and whitens without regular polishing, which ruins its appealing look.
Most beginners struggle to polish aluminum properly at first. The process becomes manageable once you grasp the simple steps. A mirror shine comes from three key steps: cleaning and preparing the surface, sanding with progressive grits, and cutting/polishing the aluminum. The project might need considerable effort, but you’ll love the final results.
This piece shows you professional workshop techniques that create stunning results, whether you want to polish aluminum by hand or need the right tools. You’ll find how this soft, easy-to-machine metal can shine like a mirror when you use the right approach. The guide covers everything from picking the perfect aluminum polishing tools to applying compounds the right way.
Understanding Aluminum and Why It Needs Polishing
A battle rages beneath every shiny aluminum surface against environmental forces. This popular metal found in cookware, automotive parts, and architectural elements needs regular maintenance to keep its looks and strength intact.
What makes aluminum dull over time
Aluminum’s porous nature makes it easy prey to environmental damage. This metal absorbs contaminants like industrial fallout, road grime, brake dust, and chemical residues more readily than others. These particles get stuck in the metal’s tiny pores and slowly rob it of its natural shine.
The metal reacts with oxygen and moisture in the air to create a protective aluminum oxide layer. This original oxidation helps shield the metal from deeper corrosion but leaves a dull, chalky look. Items left unused for long periods develop this whitish-gray layer more visibly.
Daily use speeds up the wear and tear in several ways. Road salt and chemicals make corrosion happen faster, especially on car parts. The sun’s UV rays cause the metal to fade and discolor. Dirt and grime build-up blocks light from bouncing off the surface, which takes away more of its shine.
How oxidation affects shine
Light behaves differently on oxidized aluminum surfaces. Brand new, unoxidized aluminum looks bright and almost silver-like, but it turns dull gray as oxygen bonds with the surface molecules. This happens right away and keeps going whenever air touches aluminum.
The oxide layer shows up as a powdery, chalky coating that messes with light reflection. Oxidized surfaces scatter light randomly instead of bouncing it evenly to create that mirror-like finish. Salt water, acid rain, and humid conditions speed this up and lead to worse oxidation.
The oxidation works differently from iron rust. The oxide layer acts as a shield against deeper oxidation, which explains aluminum’s strength against corrosion. Harsh conditions or chemicals can break down this protective layer and let more serious damage like pitting occur.
Why is polishing essential for longevity
Polishing aluminum does way more than make it look better. Research shows that good polishing can make aluminum surfaces last 20% longer by slowing down oxidation. This upkeep removes the oxide layer and dirt while smoothing the surface to fight future oxidation.
Polishing is a vital part of stopping aluminum’s tendency to “dry out” and turn white. The process keeps both looks and strength by removing oxidation before it digs deep into the porous structure. This becomes even more important to items that face harsh environments.
Polished aluminum has practical benefits too. Water slides off the smooth surface more easily, which gives moisture less chance to collect and start corrosion. Dirt and grease have a harder time sticking to polished surfaces, so you need fewer harsh cleaners that might harm the metal.
A specialized sealant after polishing creates extra protection. These products fill the metal’s pores and make it harder for oxidation to happen. You won’t need to maintain the surface as often either.
Essential Tools and Safety Gear for Aluminum Polishing
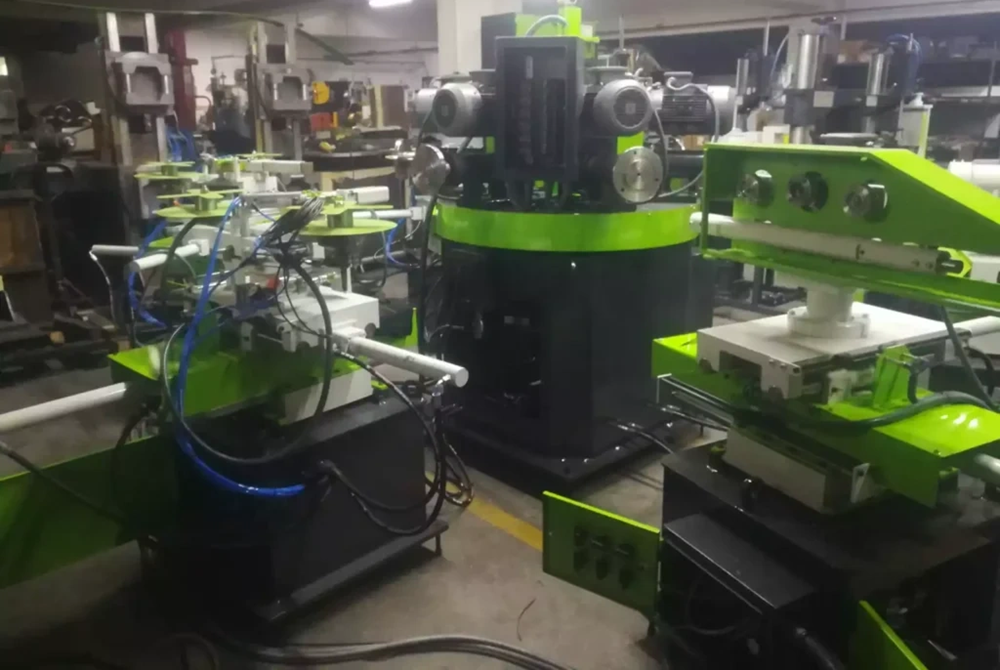
Quality aluminum polishing needs the right tools and safety gear to get professional results without risking your health. The right setup with power equipment and protective gear makes a huge difference in both safety and the final look.
Aluminum polishing tools every beginner needs
You’ll need quality equipment that can handle different stages of the process to start aluminum polishing. Here are the tools you’ll need off the top of my head:
- Rotary polisher/angle grinder – Beginners should pick a variable speed 3,500 RPM grinder for better control. The Makita 9237C works great for newcomers since you can adjust speeds between polishing stages. Seasoned polishers often prefer fixed-speed 8,000 RPM models like the Makita GA7021.
- Random orbital sander – This tool becomes a must-have with pitting, oxidation, and scratches. A 5″ orbital sander with hook and loop disks gets surfaces ready before buffing.
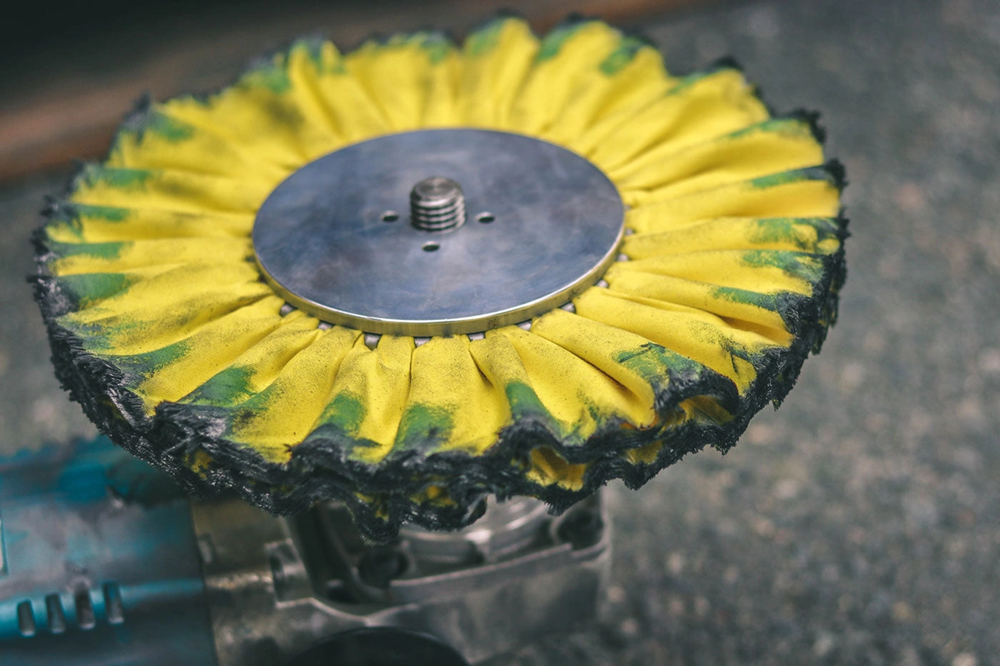
- Buffing wheels – Each wheel serves a specific purpose in a three-stage process. Orange airway wheels tackle the original cutting stage, yellow ones handle coloring, and ultra-soft flannel wheels give that final show-shine finish.
- Buffing rake – You’ll need this to remove built-up compound and metal particles from buffing wheels. It keeps your wheel working at its best.
What to use to polish aluminum safely
The right accessories help you get better results and make your tools last longer:
Safety flanges are non-negotiable for aluminum polishing. You can choose between exterior flanges for beginners or insertable ones for pros – both prevent accidents during high-speed work.
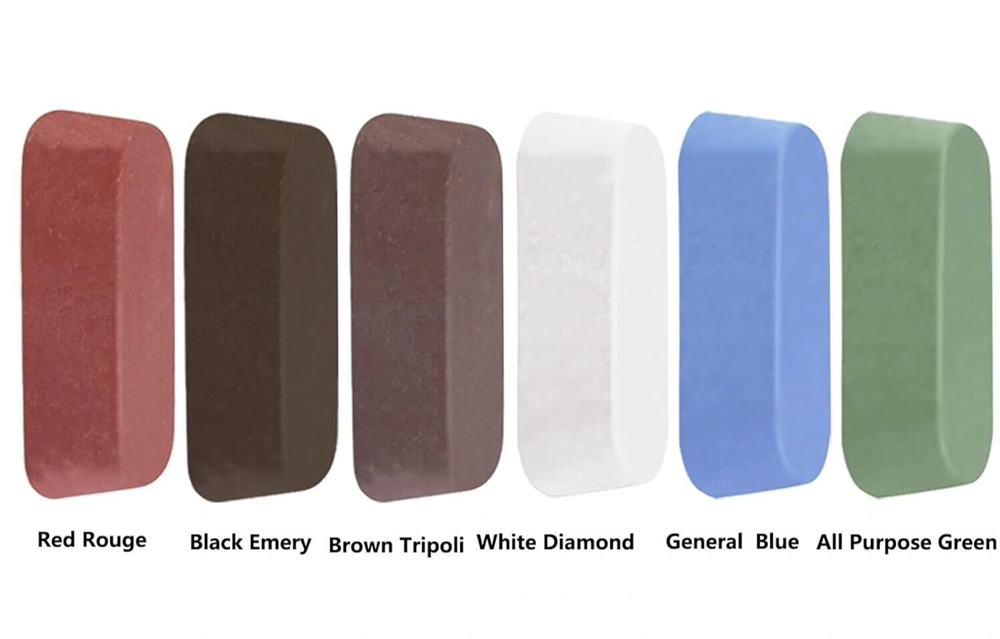
Most pros employ a systematic approach with compounds: brown tripoli compound cuts, green rouge colors, and optional ultra-fine finishing compounds create that show-quality shine. These compounds work with matching buffing wheels to gradually refine the surface.
Smaller projects or tight spaces need specialized options. Polishing balls that attach to drills are a great way to get wheels and intricate parts done. Microfiber and cotton towels help remove black oxidation residue that builds up as you polish.
Protective gear and workspace setup
Aluminum polishing creates hazardous dust and debris. The right protection isn’t optional – it’s vital:
Respiratory protection is your most significant safety gear. A full-face respirator keeps metal dust and polishing compounds out of your lungs. Basic masks don’t work well enough – they fit poorly and get uncomfortable quickly.
Eye protection becomes vital, especially when you have no full-face mask. Ear defenders help reduce noise from high-speed tools. Strong leather gloves protect your hands from abrasive materials and heat that builds up during polishing.
A comfortable workspace helps during long polishing sessions. Kneeling pads with 2″ of medium-density cushioning help prevent fatigue on the lower sections. Masking tape protects nearby painted surfaces from damage during high-speed work.
Good ventilation keeps you safe since aluminum dust can harm your health. Keeping compounds sorted by grit progression helps you work faster and prevents mixing between stages.
Step-by-Step Process to Polish Aluminum
A good aluminum polishing process follows specific steps that give amazing results. You can transform dull, oxidized metal into a gleaming surface. This just needs patience and attention to detail at every step.
1. Clean the surface well
Getting a perfect polish starts with careful cleaning. Rinse the aluminum under warm water to loosen debris. Mix a small amount of detergent (about one teaspoon per quart of water) and give the item a quick soak. Use a soft sponge or cloth to wipe in circular motions. A soft-bristled brush works great for grooves and corners. Rinse well to remove all soap residue and dry right away with a lint-free towel.
Stubborn oxidation or greasy residue might need a commercial aluminum pre-cleaner or corrosion remover. Let it sit for 2-5 minutes before rinsing. Tough buildup may need gentle scrubbing with ultra-fine steel wool or a stiff nylon brush. Use light pressure to avoid scratches.
2. Sand with progressive grits (180 to 2000)
Mirror finish starts with proper sanding. Deep scratches or pitting need 180-320 grit to start. Regular surfaces can begin with 400 grit. The progression is vital:
- Start with 320 grit (or 180 for damaged surfaces)
- Move to 400 grit
- Progress to 600 grit
- Continue to 800 grit
- Finish with 1000-2000 grit for mirror finish
Small parts work best with hand sanding. Larger pieces do better with an orbital sander using pressure-sensitive adhesive disks. Wipe away sanding dust between grit changes. This prevents particles from getting stuck in fresh scratches. Wet-sanding works great with finer grits and gives better results.
3. Apply aluminum polish and buff
Pick your polishing compound based on surface size. Small areas need a clean cloth with aluminum polish applied in small circular motions. Larger projects work better with a rotary polisher at 3500 RPM using compound bars.
Gray metal buffing compound or brown tripoli work best as initial compounds. These excel at cutting nonferrous metals and reducing imperfections. Put a small amount on the buffing wheel and work across the surface step by step.
4. Use different wheels for each compound
Each polishing stage should have its own buffing wheel. The original cutting stage pairs well with an orange airway wheel and tripoli compound. Use a yellow buffing wheel with green rouge for the coloring stage. A show-shine quality finish comes from an ultra-soft flannel wheel with purple or white rouge.
Keep compounds separate on wheels. Mixing them defeats the purpose of using finer abrasives and mixes up different grits.
5. Final wipe and inspection
Hot water with Simple Green lifts polishing compounds from aluminum’s pores after buffing. A microfiber cloth can also remove black residue. Check your work under good lighting to spot any missed areas or uneven finish.
Secret Workshop Techniques for a Mirror Finish
Professional aluminum polishers use specialized techniques that take ordinary work to extraordinary results. These methods reshape the scene from just shiny aluminum to a genuine mirror-like finish. Years of hands-on experience help master these techniques.
Using wet sanding for better results
Wet sanding is a game-changing technique that creates superior aluminum finishes. This method needs pre-soaked sandpaper and a constantly wet aluminum surface during sanding. Water works as a lubricant and prevents heat buildup that can warp or soften the aluminum surface. The process reduces dust by a lot, making it safer and more effective.
The best results come from starting with 320-grit wet sandpaper and moving through 400, 600, 800, and finally 1500 or 2000-grit. A rubber or foam backer helps apply steady pressure when wet sanding aluminum. This creates an even surface that’s perfect for a mirror shine.
How to polish aluminum by hand vs. machine
Hand polishing gives you precise control over small projects and intricate details that machines can’t reach. The quickest way to hand polish aluminum needs a soft cloth with a small amount of polish. Light, steady pressure in small circular motions works best. This method gives excellent control but takes more time and physical effort.
Machine polishing delivers faster and more consistent results, especially on bigger surfaces. Beginners should use a rotary polisher at 3500 RPM, while experienced polishers might push it to 6000 RPM for faster results. Random orbital polishers work great for the final touches. Their free-spinning action removes minor swirls without creating new marks.
Layering compounds for deeper shine
A mirror-like aluminum shine comes from proper compound progression:
- Start with gray metal buffing compound on a stiff wheel for cutting
- Follow with brown tripoli on a clean wheel for honing
- Complete with white rouge on a soft wheel for mirror finish
Each compound needs its own wheel to maintain the progressive refinement process. Competition-grade finishes sometimes need an ultra-fine purple compound as a fourth step.
Avoiding swirl marks and residue buildup
Swirl marks show up from skipping grit levels, pushing too hard, or using dirty wheels. The solution is a step-by-step approach to grit progression without skipping more than one level. Clean your wheel with a buffing rake as soon as black residue appears. This prevents abrasive particles from getting stuck in the aluminum.
Stubborn residue comes off easily with corn starch or baking flour applied using a clean cotton cloth. Natural sunlight helps spot imperfections that artificial lighting might miss. A swirl-free finish needs different sanding directions between grit changes.
Choosing the Right Polishing Compounds and Buffing Wheels
Getting that perfect mirror finish on aluminum comes down to choosing the right compounds and buffing wheels at each stage. Every component has a specific job that helps turn a dull piece of metal into a brilliant, reflective surface.
Tripoli, white rouge, and green rouge explained
Brown Tripoli starts the aluminum polishing process as a cutting compound that removes scratches and blemishes. This semi-wet compound bar cuts more gently than black compounds, which makes it perfect for the original work on aluminum, brass, and copper. The compound removes 400 and 600 grit sand marks and prepares surfaces for finer polishing steps.
White rouge stands out as the coarsest finishing compound and works well on many metals. People often call it “Jeweler’s Rouge” because it excels at polishing aluminum and chrome. You can use this compound as a final finish on harder metals or as a cutting agent on softer ones. It creates a bright shine on aluminum surfaces.
Green rouge contains green chromium oxide and really shines at polishing aluminum. This “high color” compound fills aluminum’s porous surface and reflects a rich luster that creates that mirror-like finish we all want. Green rouge produces deeper color depth and brighter finishes than white compounds. Most aluminum polishing enthusiasts prefer it as their second-step compound.
Best way to polish aluminum with compound bars
The best results come from a systematic approach. Start with Tripoli to cut, move to green rouge to color, and finish with blue or purple compound if you want that show-quality shine.
Proper compound bar application needs a spinning buffing wheel. Just press the bar gently against the wheel’s edge. Remember this golden rule: “apply little and often” instead of loading too much compound. You must switch wheels between compounds to avoid mixing different abrasives.
When to use flannel vs. airway wheels
Airway buffing wheels use specially treated pleated cloth that helps air flow better and keeps heat down. Orange airway wheels work great with Tripoli compound at 3,000-3,500 RPM during the cutting stage. Yellow airway wheels match perfectly with green rouge at 2,200-2,800 RPM for the second coloring stage.
Flannel wheels provide super-soft buffing that works great for final finishing. These wheels can work around tricky spots like valve stems and brackets because they’re softer. The best show-quality shine comes from Domet flannel or UBM (unbleached muslin) buffing wheels paired with blue rouge or purple compound. Just keep those RPMs under 2,200 to get optimal results.
Conclusion
Transforming Your Aluminum Polishing Skills
Aluminum polishing turns ordinary metal surfaces into extraordinary showpieces with a methodical process. This guide helps readers find why aluminum needs regular maintenance because of its porous nature and how it can oxidize. These fundamentals are the foundations of successful polishing projects.
The right equipment makes the biggest difference in results. Each tool serves a specific purpose in the transformation – from rotary polishers and orbital sanders to specialized buffing wheels and compounds. Safety gear protects you from harmful dust and debris to ensure your health and project success.
Surface preparation, progressive sanding, and compound application work together to create mirror-like finishes. You can raise your results from clean to exceptional with professional techniques like wet sanding and proper wheel selection. The differences between hand and machine polishing give beginners the power to choose what works best for their projects.
Compound choice is a vital part of getting the results you want. Brown tripoli, white rouge, and green rouge each add something unique to the polishing progression. Pairing them with the right buffing wheels gives the best results. This approach helps amateur polishers create work they can be proud of.
Aluminum polishing needs patience and attention to detail, but the results are worth the effort. A well-polished aluminum surface looks stunning and fights off future oxidation better than untreated metal. These skills work on other metal polishing projects too, which expands your workshop’s capabilities.
Note that you’ll master this craft through practice. Each polishing session builds your muscle memory and helps you understand how aluminum responds to different techniques. What seems complicated now will become second nature, and your results will keep getting better with every project.
Aluminum polishing combines science and art – you need technical knowledge and a craftsman’s touch. This guide gives beginners the confidence to start their first polishing projects with the same secrets professionals use to get that perfect mirror shine.
FAQs
Q1. What causes aluminum to lose its shine over time? Aluminum loses its shine due to oxidation, which occurs when the metal reacts with oxygen in the air. This process creates a dull, chalky layer on the surface. Additionally, environmental factors like dirt, grime, and chemical exposure can contribute to the dulling of aluminum surfaces.
Q2. What are the essential tools needed for aluminum polishing? The essential tools for aluminum polishing include a rotary polisher or angle grinder, a random orbital sander, buffing wheels of different types (orange airway, yellow airway, and flannel), a buffing rake, and various polishing compounds. Safety gear such as a respirator, eye protection, and gloves are also crucial.
Q3. How do I achieve a mirror finish on aluminum? To achieve a mirror finish on aluminum, follow a step-by-step process: thoroughly clean the surface, sand with progressive grits (180 to 2000), apply aluminum polish and buff using different wheels for each compound, and finish with a final wipe and inspection. Using wet sanding techniques and layering compounds can help achieve an even deeper shine.
Q4. What’s the difference between polishing aluminum by hand versus machine? Hand polishing offers precision for small projects and intricate details but requires more time and effort. Machine polishing, using a rotary or random orbital polisher, delivers faster and more consistent results, especially on larger surfaces. Beginners often start with a 3500 RPM rotary polisher, while experienced users might use higher speeds for quicker results.
Q5. How do I choose the right polishing compounds for aluminum? For aluminum polishing, start with brown Tripoli compound for initial cutting, followed by green rouge for coloring and achieving a deeper luster. For a show-quality finish, you can use white rouge or specialized blue or purple compounds. Always use different buffing wheels for each compound to prevent cross-contamination and achieve the best results.