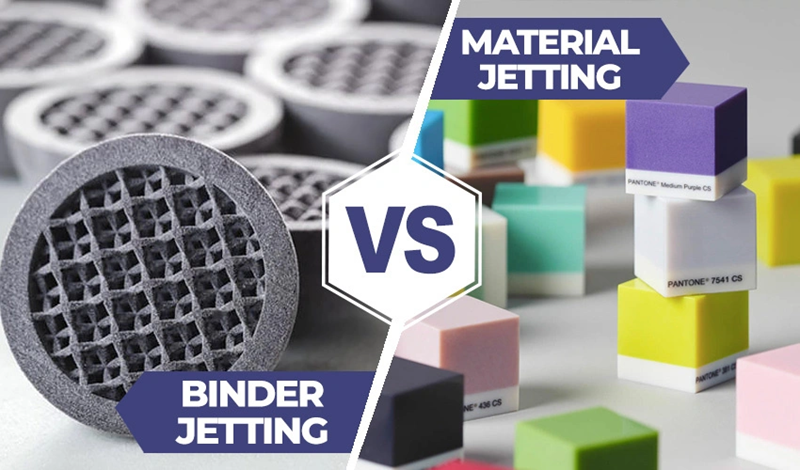
A comparison of binder jetting materials with other 3D printing technologies reveals two distinct processes with unique approaches and capabilities. MIT developed binder jetting in 1993. This process uses a liquid binder and powder material to create parts. Material jetting came later in 1999 through a patent. It works like a traditional inkjet printer but produces three-dimensional objects.
Binder jetting and material jetting differ in several key aspects. The binder jetting process enables the creation of affordable parts with complex geometries using metals and ceramics. Material jetting 3D printing stands out with its print resolution. It achieves the highest detail among all commercial equipment, which makes it perfect for intricate prototypes. The binder jetting process runs at room temperature and reduces warping risks. Material jetting needs support structures from soluble materials that must be cleaned after printing.
Each technology shines in different industries. Manufacturers use binder jetting to produce aesthetic prototypes, sand casting molds, tooling, jewelry, and aerospace parts. Material jetting proves valuable in creating anatomical models. Medical professionals use these models to plan surgeries and educate students. The technology also excels at producing color prototypes. A clear grasp of these differences helps users pick the right technology that matches their production requirements.
Printing Process Breakdown
Binder jetting and material jetting work in fundamentally different ways. These differences affect their production capabilities. Each technology follows unique principles that determine what materials they can process and what parts they excel at making.
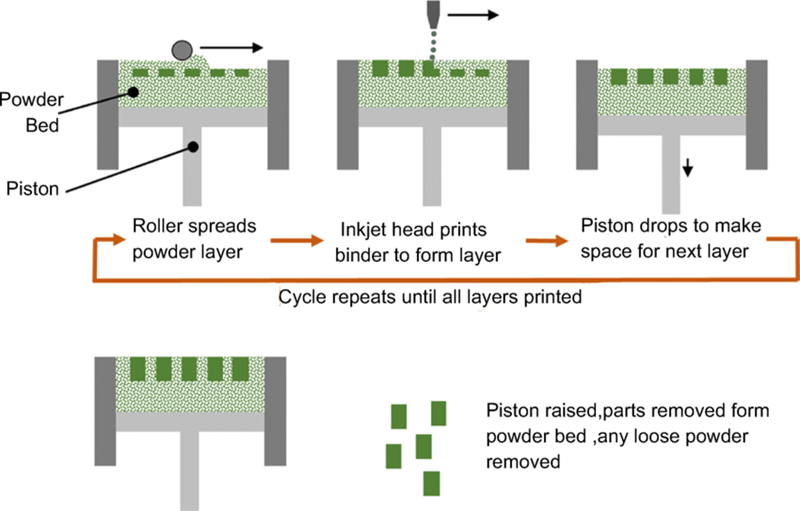
Binder Jetting Process: Powder Bed + Liquid Binder
The binder jetting process uses a liquid binding agent that’s carefully deposited onto layers of powder material. A recoating blade spreads a thin layer of powder across the build platform. The powder can be metal, sand, ceramic, or polymer. A print head moves along the X and Y axes and precisely places droplets of binding agent onto specific areas of the powder bed. Each droplet measures about 80 μm in diameter, which helps achieve good resolution. The build platform then lowers by one layer’s thickness, and fresh powder spreads on top. This cycle continues until the object takes its final shape.
Binder jetting’s room temperature operation sets it apart from other additive manufacturing technologies. This feature eliminates the thermal distortion issues that other 3D printing processes face and lets binder jetting create parts with complex geometries.
Material Jetting Process: UV-Cured Photopolymer Droplets
Material jetting works like a 2D inkjet printer, but it builds objects in three dimensions. Printheads deposit tiny droplets of liquid photopolymer resin onto the build platform. The materials need heating to 30-60°C to reach the right viscosity for jetting. UV lamps cure and solidify the material right after it’s deposited, before the next layer goes on. The platform lowers, and this process repeats layer by layer until the object is done.
Material jetting shines when it comes to precision. It can print layers thinner than 20 microns, making it one of the most accurate 3D printing methods available. Multiple printheads can work together, which allows for multi-material and multi-color printing in one build.
Support Structures: Required vs Not Required
These technologies handle support structures quite differently. Binder jetting does not require support structures because the loose powder around the printed object provides natural support throughout the process. This means less post-processing time and more freedom to create complex internal geometries.
Material jetting takes a different approach – it always requires support structures printed using dissolvable material. These supports stop the part from deforming during printing and need removed afterward through water or chemical baths. Modern material jetting systems use dissolvable supports that leave almost no marks on the finished part.
Post-Processing Steps: Cleaning, Sintering, and Curing
Both technologies need specific post-processing procedures, but their requirements are quite different. Binder jetted parts stay wrapped in loose powder while they “cure” to gain strength. Pressurized air removes the excess powder later. Metal binder jetted parts need extra steps:
- Sintering—the part is heated in a furnace between 1100°C and 1600°C to fuse metal particles
- Infiltration—adding materials like bronze into the part’s pores improves density and strength
Material jetted parts need simpler post-processing. The main task involves removing support materials with water jets or chemical baths. UV light during printing usually cures the resin fully, so no extra curing steps are needed. Some parts might need a final cleaning step to get the best surface quality.
These process characteristics help determine which technology works best for different production needs and materials.
Material Compatibility and Flexibility
Material choice plays a vital role in choosing between binder jetting and material jetting technologies. Each method comes with its own set of materials that make it suitable for different industries.
Binder Jetting Materials: Metals, Ceramics, Sand, Polymers
Binder jetting works with an impressive range of powder materials. The process performs well with metals like stainless steel, bronze, and aluminum, along with ceramics, sand, and polymers. Metal applications usually need gas-atomized powders instead of water-atomized ones. These powders flow better and pack more densely in dry form. Gypsum was one of the first materials used in binder jetting. People value it for its low cost, white appearance that’s perfect for adding color, and its biocompatibility. The technology also works with specialized materials such as tungsten carbide and Inconel alloys, which opens up more industrial uses.
Material Jetting Materials: Photopolymers, Waxes, Elastomers
Material jetting mainly uses photopolymers and wax-like materials. These materials need specific viscosity levels to flow properly through the jetting nozzles. The common options include rigid photopolymers for basic prototyping, rubber-like flexible materials (from 30 to 90 Shore A), clear photopolymers for optical uses, and biocompatible materials for dental and medical applications. “Digital materials” are a remarkable development that combines multiple photopolymers. These create composites with mixed properties, like materials that blend rigidity with flexibility.
Color Capabilities: Full-Color Binder Jetting vs Limited Color Jetting
Both technologies excel at full-color production, but they take different paths to get there. Binder jetting stands out as one of the few 3D printing methods that can create true full-color objects using multiple ink channels. The process usually combines white powder, often gypsum, with colored binders to create vibrant results. Material jetting creates color through systems like PolyJet. This method builds objects by spraying tiny droplets of photopolymer in CMYKW (cyan, magenta, yellow, black, and white). Color accuracy varies between the two. Material jetting gives you better control over color reproduction compared to other additive manufacturing processes.
Material Limitations: Proprietary Resins vs Open Powder Options
Both technologies come with their material challenges. Material jetting depends on proprietary photopolymer resins that cost a lot – usually between $300-$1000 per kilogram. These materials also lack the strength needed for functional end-use parts. This makes material jetting parts better suited for visual prototypes rather than mechanical uses. Binder jetting gives you more material options with cheaper powders, especially for non-metal applications. You can recycle 100% of unused powder in binder jetting. Other powder-based technologies need partial replacement of materials.
Production Quality and Accuracy
Quality differences between binder jetting and material jetting become clear when you look at finished parts. These processes have unique characteristics that stem from their basic properties and materials.
Surface Finish: Smooth vs Powdery
Material jetting creates exceptionally smooth surfaces that match injection-molded quality. Parts show a clean, glossy, or matte finish, and you can barely see the layer lines. The UV curing process and tiny photopolymer droplets naturally create finer surface details. Binder jetting parts have a more textured, powdery surface made up of bonded particles. Earlier binder jetting systems used large powder particles (around 100 μm), but newer systems have brought this down to about 10 μm. You need post-processing to get smoother surfaces with binder jetted parts.
Dimensional Accuracy: ±0.1mm vs ±0.3mm
These technologies show substantial differences in precision. Material jetting hits an impressive accuracy of ±0.1% with a minimum of ±0.05 mm. A standard 100 mm part stays within ±0.05-0.1 mm. Binder jetting reaches about ±0.3% accuracy with a minimum of ±0.3 mm. Material jetting’s precision advantage makes it the better choice for parts that need exact dimensions and tight tolerances.
Resolution Capabilities: 16 Microns vs 50 Microns
Resolution varies greatly between these technologies. Material jetting leads the pack with layer thicknesses as small as 16 microns. This makes it the highest resolution option among commercial 3D printing systems. Some systems can print up to 30-micron layers, but 16 microns remains standard. Binder jetting typically works with 100-micron layers. This explains why material jetting captures fine details that binder jetting misses.
Mechanical Properties: Brittle Resins vs Sintered Metals
The mechanical characteristics set these technologies apart. Material jetted parts use photopolymer resins that offer precision but tend to be brittle with limited practical uses. These parts work better for looks than function since their mechanical properties fall short of other 3D printing methods. Metal binder jetting’s sintering process improves mechanical properties, though controlling this process can affect dimensional accuracy. Higher sintering temperatures make metal binder-jetted parts stronger, so they are suitable for some functional applications despite size limitations.
Real-World Applications and Use Cases
The benefits of binder jetting and material jetting show up clearly in their real-life applications that highlight what makes each technology special.
Binder Jetting: Sand Molds, Metal Prototypes, Figurines
Binder jetting shines when making sand casting molds without needing complex tooling and patterns. Digital foundries can now create shapes that were impossible before and make intricate cores that fit together faster. The technology also creates photographic props, product packaging, and figurines for low-stress uses. Car makers now use this method to build heat exchangers with complex shapes. Artists love how binder jetting’s full-color abilities help them create detailed sculptures.
Material Jetting: Dental Models, Microfluidics, Investment Casting
Material jetting really stands out in precision work. Dentists use it to make implant surgical templates that are incredibly accurate at entry points and apex. Tests show dental crowns made this way have mean discrepancy values of 91.1-141.1 μm, which beats milled crowns at 171.6 μm. The technology’s sharp detail makes it perfect for microfluidic devices with exact channel shapes. On top of that, it creates wax patterns for investment casting of precious metals, especially in jewelry.
Industry Adoption: Aerospace, Medical, Jewelry, Automotive
Aerospace companies use binder jetting to make lightweight components that cut fuel use and CO2 emissions. Medical teams create anatomical models for surgery practice and patient education through material jetting. Binder jetting has become a game-changer in jewelry making, and platinum now works for direct printing on systems like the Production System P-1. The car industry gets value from both methods—ExOne and BMW Group have worked together for over 20 years, and BMW runs four ExOne Exerial systems to make water jacket cores.
Case Study: Binder Jetting in Foundry vs Material Jetting in Dentistry
Binder jetting has altered the map of sand casting by removing the need to create patterns—a slow, labor-heavy process. Material jetting has done the same for dental work through better accuracy. Research comparing implant guides made with different technologies found that material jetting had the best dimensional accuracy. Studies also showed dental restorations made with material jetting fit better inside and around the edges compared to CAD/CAM milled systems.
Cost, Speed, and Scalability
Money and production speed are key factors to think about when comparing binder jetting and material jetting technologies. Each technology brings its benefits in economics, speed, and production capacity that shape how viable they are in industry.
Machine Cost: $30K–$200K vs $60K–$750K
These technologies need very different levels of investment. Binder jetting systems cost between $30,000 and $200,000. The price goes up with larger build volumes and extra features. Material jetting equipment costs much more. The basic systems, like Stratasys J5 MediJet, start at $60,000, while advanced multi-material machines can cost up to $750,000. This big price gap at the high end shows material jetting’s precision capabilities rather than its production capacity.
Material Cost: Low-Cost Powders vs High-Cost Resins
Material costs create another big difference between these technologies. Binder jetting works with cheaper powders. Some manufacturers even use waste materials like sawdust to cut costs further. That’s why experts call binder jetting “the most cost-effective way to 3D print parts”. Material jetting uses special photopolymer resins that cost $25 to $400+ per liter. This makes each part much more expensive to produce.
Print Speed: Faster Binder Jetting for Bulk vs Slower High-Detail Jetting
Binder jetting wins in production speed, especially for batch manufacturing. One binder jetting machine can build up to 200 cm³/minute, which is much faster than material jetting systems. The cleanup after printing is also simpler with binder jetting, which “increases the overall process speed differential”. Small binder jetting systems can make up to 100 liters of parts daily – about 50 times more than similar FDM printers.
Scalability: Batch Production vs Prototype-First Approach
Binder jetting shows better scaling potential. The printer works at the same speed whether it’s making one part or 200 parts. These systems can handle industrial-sized projects of several cubic meters, making them great for mass production. Material jetting might be slower, but it shines in prototype development where precision matters more than volume.
Comparison Table
| Characteristic | Binder Jetting | Material Jetting |
|---|---|---|
| Technical Specifications | ||
| Layer Thickness | ~100 microns | 16-30 microns |
| Dimensional Accuracy | ±0.3% (±0.3mm minimum) | ±0.1% (±0.05mm minimum) |
| Operating Temperature | Room temperature | 30-60°C |
| Support Structures | Not required | Required (dissolvable) |
| Materials & Properties | ||
| Material Types | Metals, ceramics, sand, polymers | Photopolymers, waxes, elastomers |
| Surface Finish | Textured, powdery | Smooth, injection-like quality |
| Color Capabilities | Full color | CMYKW color system |
| Material Cost | Lower cost powders | $300-$1000 per kg |
| Production Characteristics | ||
| Build Speed | Up to 200 cm³/minute | Not specified |
| Surface Quality | Needs post-processing | Minimal post-processing |
| Material Recycling | 100% of unbonded powder | Not mentioned |
| Mechanical Properties | Strong (for metals after sintering) | Relatively brittle |
| Equipment & Costs | ||
| Machine Cost Range | $30,000-$200,000 | $60,000-$750,000 |
| Primary Applications | ||
| Use Cases | Sand casting molds, metal prototypes, figurines, heat exchangers | Dental models, microfluidics, investment casting, and anatomical models |
| Industry Focus | Aerospace, automotive, jewelry | Medical, dental, prototyping |
Conclusion
Binder jetting and material jetting are two different approaches to additive manufacturing. Each technology has its strengths that match different production needs. The comparison reveals several key differences that help choose the right technology for specific uses.
Material jetting shines when it comes to precision work that needs fine details. The technology creates parts with exceptional surface quality and resolution. It achieves layer thicknesses as small as 16 microns and dimensional accuracy of ±0.1%. In spite of that, these benefits come with a hefty price tag. You’ll need to invest heavily in equipment ($60K-$750K) and spend more on proprietary photopolymers.
Binder jetting shows great promise for production-focused applications. The technology works without support structures and handles many materials, including metals and ceramics. Parts cost substantially less to produce. It also runs at speeds up to 200 cm³/minute, which makes it perfect for batch manufacturing.
Your project requirements will help you pick between these technologies. Material jetting works best for dental models, anatomical replicas, and detailed prototypes where precision matters most. Binder jetting serves industries that need functional metal parts, sand casting molds, or economical production runs.
Both technologies are evolving faster than ever. Binder jetting systems keep getting better at resolution while staying cost-effective. Material jetting manufacturers are working to add more material options beyond photopolymers. So these technologies might end up sharing some capabilities in certain areas.
Manufacturers should evaluate their specific needs carefully. They must balance resolution needs against production volume, material properties against costs, and upfront investment against long-term expenses. Material jetting delivers unmatched precision for specialized uses, but binder jetting provides the most practical way to scale additive manufacturing for production.
FAQs
Q1. What are the key differences between binder jetting and material jetting? Binder jetting uses a liquid binder to bond powder materials, while material jetting deposits droplets of photosensitive resin that are cured with UV light. Binder jetting works with a wider range of materials, including metals and ceramics, while material jetting primarily uses photopolymers. Binder jetting is generally faster and more cost-effective for larger production runs, while material jetting offers higher precision and surface quality.
Q2. Which technology provides better dimensional accuracy? Material jetting typically offers superior dimensional accuracy, with tolerances of around ±0.1% (minimum ±0.05 mm). In comparison, binder jetting usually achieves accuracies of about ±0.3% (minimum ±0.3 mm). This makes material jetting preferable for applications requiring very precise dimensions and tight tolerances.
Q3. How do the costs compare between binder jetting and material jetting? Binder jetting tends to be more cost-effective overall. The machines are generally less expensive, ranging from $30,000 to $200,000, compared to $60,000 to $750,000 for material jetting systems. Binder jetting also uses lower-cost powder materials, while material jetting requires more expensive proprietary resins. However, material jetting may be more economical for small, highly detailed parts.
Q4. What are some typical applications for each technology? Binder jetting is commonly used for sand casting molds, metal prototypes, figurines, and functional parts in industries like aerospace and automotive. Material jetting excels in applications requiring high precision, like dental models, anatomical models for medical use, jewelry prototypes, and microfluidic devices.
Q5. How do the production speeds compare between the two technologies? Binder jetting generally offers faster production speeds, especially for larger batches. A single binder jetting machine can achieve build rates up to 200 cm³/minute. Material jetting is typically slower but provides higher resolution. Binder jetting’s speed advantage makes it more suitable for higher volume production runs, while material jetting is often preferred for prototyping and small batch production of highly detailed parts.